Showing posts with label Hotspot. Show all posts

Saturday, May 18, 2024

New Amateur Radio Repeater Technology in the Southern Cape

New amateur radio repeater technology soon available in the Southern Cape on the "Aasvoëlkop" Repeater Site. 

There is great excitement amongst the users of the 145.750 Mhz "Aasvoëlkop" Repeater.

What is the hype about this new repeater? I will try to explain.  The new repeater has arrived and was recently programmed by Rassie ZS1RP and Dolf ZS1DRP.  The repeater is currently with Johann ZS1AAC who is tending to the duplexer and other equipment needed to bring this repeater to life. The repeater will soon be installed at the 145.625 Mhz Repeater Site in Still Bay.  Once all parameters is confirmed it will be moved to the 145.750 Mhz "Aasvoëlkop" Repeater Site.

A big word of thanks to Johann ZS1AAC, Dolf ZS1DRP and Rassie ZS1RP who is instrumental in the purchase and setting up/programming of this repeater to the benefit of all radio amateurs. As mentioned before this is only the beginning.  There will be more repeater installations and future upgrades in the Southern Cape.  Watch this space!!  I will keep you posted in this regard.

Now we still do not know what repeater you are talking about.  Let's have a closer look.  Here is two photos of the brand spanking new repeater on the test bench.


It is the Yaesu DR-2X 50W Digital Repeater (C4FM IP Interconnect Dual Band Receiver System Multi-function Repeater)


Now lets look at the specifications and other interesting information:

YAESU DR-2X supports C4FM digital / regular FM dual mode and dual receive function relay platform, which includes VHF and UHF amateur radio band. Through the AMS function, the DR-2X mixes communication using conventional FM mode communication and C4FM digital mode.

1. C4FM digital mode provides perfect audio quality
Compared with other digital models, the C4FM modulation mode has better bit error rate (BER) characteristics to ensure good speech quality in communication. The C4FM digital high definition voice technology using 12.5kHz bandwidth enables the high quality voice communication to be transmitted perfectly.


2. AMS makes conventional FM and digital FM friendly co-exist (automatic mode selection).
System integration enables all users, including users using different modes, to communicate with each other. AMS makes all systems possible. AMS automatically identifies C4FM digital signals or regular FM signals, and then DR-2X transforms the identified signals into the current communication mode.

3. Flexible double receiver function
The unique real-time double receiver relay – DR-2X can assign an additional control relay to the relay administrator, transmit an emergency signal, or specify second uplink frequencies. Relay administrators can also independently allocate downlink frequencies based on uplink frequencies.


4. Enhanced Digital Group ID Function
The revolutionary digital group ID function enables users who share the same digital group identification code to quickly and quickly track multiple communication resources and display group member signal strength and telemetry information.
DG-ID
A group ID (0-99) can specify members to participate in group communication. In addition, multi-point relay transmission can be controlled by DG-ID.
DP-ID
For safe relay station operation, you can register the sole ID of the relay station for personal operation identification. DP-ID can restrict access to the relay station members of registered ID.

5. Based on Internet connection relay link system (IMRS), large area expands signal coverage (option).
The Internet link Relay link system (IMRS) allows relay use to connect multiple relays via LAN or WAN. Based on the inherent stability defects of WAN connection, such as the Internet, or the words happen all happened, the new DR-2X mixed a variety of forms of network environment, making the connection between the relay more direct, ensuring the quality of digital communication. Digital group identifier can be used to control relay activation. * required component LAN unit (LAN-01A)


6.
Friendly interactive settings interface 3.5 inch full touch screen

7. Advanced operation
The rear panel controls the I/O port and can be connected to the S-COM7330 relay controller. Up to 3 DR-2X units can be connected to provide programmable sound, clock, access modes and other functions.
8. Other functions
Built-in AC power supply (North American and Asian versions)
Digital squelch code (DSQ) signaling
19-inch standard cabinet connection
CTCSS and DCS sub audio
High stability +-2.5ppmTCXO
Overtime Interdiction Function (TOT)
Firmware upgrade
9. Supplied accessories
AC power cord
DC power cord with fuse
Spare fuse (5A/15A)
Plastic foot
PC Cable SC-20
Operation Manual
Warranty Card

The Yaesu DR-2X is a full feature, heavy duty, C4FM/FM dual band repeater/base station. And unlike many other repeaters, the DR-2X handles conventional FM and C4FM digital transmission. The Yaesu System Fusion technology features the AMS – Automatic Mode Select function that instantly recognizes whether the signal is C4FM digital or conventional FM and automatically switches to match the received mode. The front panel features a full color 3.5 inch, high luminescence TFT touch screen display. The rear panel has both AC input and backup DC input. The power input is auto-switched to backup DC input during power outages.

System Fusion Key Features:
– AMS (Automatic Mode Select) function automatically recognizes the signal as C4FM digital or conventional FM
– Better BER (Bit Error Rate) characteristics of C4FM provides Superior Audio Quality and Crisp Clear Voice
– Better BER (Bit Error Rate) characteristics of C4FM provides better reception while moving and challenging weak signal
– Full 12.5 kHz bandwidth system provides high-speed data communication
– Snapshot Function allows you to enjoy image data with time and GPS information
– Digital Group Monitor (GM) Function
– Smart Navigation Function

Radio Features:
– Modulation Modes: 12.5 kHz C4FM Digital, Conventional FM
– AMS (Automatic Mode Select) function automatically recognizes the signal as C4FM digital or conventional FM
– 3.5-inch Full Color Touch Panel Operation
– Extremely reliable, high RF Output Power: 50/20/5 Watts
– Emergency Operation: Supports auto-switched backup battery power operation
– Front panel microphone connector is provided for use in repeater transmitter testing, and enables use as a base station
– Built-in large-size monitor speaker with front panel volume control
– Internal AC power supply
– 19″ Rack Mount Available
– High Stability ±2.5 ppm TCXO included
– DSQ (Digital Squelch Code) Signaling feature
– CTCSS and DCS Signaling feature
– ID announcement feature (Voice Mode: Requires FVS-2)
– Rear panel Control I/O port is connectable with the “S-COM 7330” repeater controller
– Base Station Operation – Adjustable Squelch Hysteresis (requires a stronger signal to open the squelch than it does to keep it open).
– Adjustable Squelch Tail
– CWID/Voice announcements with stripped PL Tones

DR-2X Exclusive Features::
 -  Dual Receive Operation
 -  Improved News Station feature permits sharing the voice and text messages to members.
 -  Group Monitor feature supports easy Grouping Set-up
 -  Stable High Power Output with large heat sink
 -  Commercial grade components for long-term reliable operation
 -  IMRS (Internet-linked Multi-site Repeater System) function for simple expanded area coverage via the Internet (option).

Specifications:
RX/TX Frequency Ranges: 144 to 148 MHz, 430 to 450 MHz
Channel Steps: 5/6.25 kHz
Circuit Type: Double conversion superheterodyne
Modulation Type: F1D, F2D, F3E, F7W
Power Output: 50/20/5 Watts
Case Size (W x H x D): 19″ x 3.5″ x 15″ (482x88x380mm) excluding knobs and connectors
Weight (approx.): 22.05 lbs. (10 kg)


Final Remarks:

I did some research and played around with various digital radio communication "nodes" in the past.  I would like to share my opinion on a few aspects:

1. This repeater is multi-purpose. VHF/UHF, FM Analog or C4FM Yaesu System Fusion (YSF) and
lends itself to having many more communication choices. Something that is very beneficial these days in Amateur Radio. The audio compared to FM Analogue is excellent as is the Digital Audio C4FM.

2. The repeater function IMRS Lan Module, allows 99 other repeaters to be connected via IP Linking through the Internet.
 
3. Another function is that the repeater can distinguish which mode is used and then automatically switch between the modes. This makes the repeater compatible with traditional FM mode radios and
repeaters.

4. In C4FM mode, call signs and GPS location information can be included in the digital speech
data, which is displayed on digital radios. The following information is displayed: Call sign,
Distance and Direction to the other station. Even small photos can be sent to other stations.

5. Yaesu is the sole manufacturer of YSF equipped radios. The current Yaesu radios are: FT-
1XDR, FT-2DR, and FT-5DR for hand radios, with the FTM-3200R, FTM-100R, FTM-300, FTM-
400R and FTM500DR for mobile units.
 
6. I hear radio amateurs murmuring that they will now have to buy new radios to be able to use YSF.
No, not at all. There are always alternative ways. If you already have a Hotspot then use Pi-
Star's ability to connect to YSF. You can then use DroidStar or a DMR Radio via a YSF "gateway" or "reflector". The second solution is to create a Bridge between YSF and DMR. The last option enables radio amateurs to communicate with Analogue or Digital using Echolink, AllStar or DMR radios whichever option you choose. No one will be left out in the cold.

7 The IMRS Lan Module is optional but is required if you want to connect other repeaters via IP
Links. It also enables you to connect Echolink / AllStar directly to the repeater site. The connection can be controlled via DTMF or the Internet. In my opinion, the IMRS Lan Board is a good addition to the Yaesu DR-2 X Repeater and I encourage repeater owners to buy it as this is the direction in which the technology and amateur radio networks are moving.

8. Here and there radio amateurs might experience small "hiccups" but this is attributed to failure to read and study manuals. The repeater has a learning curve that one will have to overcome and I am sure there might be a few  bumps along the way.
 
9. Having played around with various digital platforms, I think Yaesu's C4FM (YSF) and DMR
are currently the forerunners in the field of digital technology. In my opinion, C4FM from Yaesu is a short head in front of DMR in terms of audio quality. Even in "Digital Narrow" (DN) mode the
Yaesu audio is more natural than all the current digital platforms.

10. Important: The Yaesu DR-2X repeater does NOT have a "full duty cycle" at 50 watts but does
at 25 watts. Something to take note of,  but 25 watts is more than adequate power output vs the location of the Aasvoelkop Repeater.

The Yaesu DR-2X repeater receives an average of 4.7 out of 5 for operation and reliability from radio amateur ranks. The rating says something about this repeater, doesn't it?

I am looking forward to utilize the new Yaesu DR-2X Repeater soon to be installed on the "Aasvoëlkop" Repeater Site!!


End.

Monday, January 1, 2024

Let's build a Radio-less Allstar Node! - By Curtis ZS6CMO


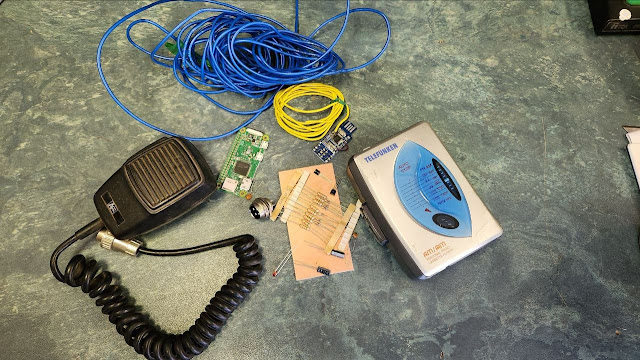
This project started with the above photo and a discussion between ZS6CMO and ZS1I on the Amateur Radio 101 Telegram group.  Needless to say that the above pile of components turned out to be a radio- less Allstar node that was constructed by Curtis ZS6CMO.

For more details on the project visit:  How to build your own radio-less Allstar node

But why would one build a radio-less Allstar node?

Radio-less nodes are ideal for use cases where WiFi or wired Ethernet are available but the additional range provided by an HT or mobile radio is not needed, such as for a desk or table at your home QTH / office / shack, for vehicles or caravans where you have a WiFi hot spot, and for 2nd offices, hotels, etc. Radio-less nodes are the simplest, easiest and most cost-effective way to get on AllStar with your own node, and are more portable than even the smallest radio-based node and radio needed to access it.

For a node that's sitting a few meters away on a desk it makes more sense to use a radio-less node than to have multiple radios on transmitting 100's of mW of RF.

Radio-less nodes are more energy efficient, using generally less than a few Watts, vs. a node with radios plus other radio(s) to access it is easily 3 times the energy consumption. This efficiency means that a radio-less node can be left on and connected to your favorite repeater/hub 24x7 with no noticeable effect on your electricity account and no need to recharge batteries, unless load-shedding intervenes or when leaving radios powered on.

Radio-less nodes also support Full-Duplex by default. This is a powerful feature and makes a properly designed radio-less node much nicer to use than any half-duplex node.

A Radio-less Node is a very useful node as described above and a must have if you use VOIP. 

Photos and images  (Click on images for larger view.)


Saturday, November 25, 2023

Intermittent problems with my Jumbo Digital Radio Hotspot


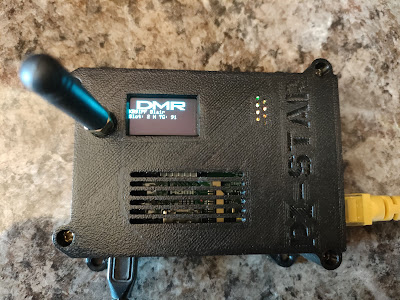
Image: ZS1I Jumbo Hotspot using a Raspberry Pi 3 b
 
Before I provide more information about the problems I experienced with my Digital Radio Jumbo Hotspot, we need to look at the following: 

Intro:

In the world of DMR, there are two ways to gain access to the now worldwide network. One is a repeater, the other is using a hotspot. Which method is best is determined by several factors. One of the main factors is how far you are from the local repeater. If you are not within range of a repeater, a hotspot may be your only choice.

Both a hotspot and a repeater can be used to connect to a DMR network. So let's take a look at the networks.

The Brandmeister Network is the commonly associated with hotspot operation, while the DMR-MARC network is associated more with repeater operation.

What is a digital radio hotspot?

“Hotspots” are digital-only, small, low-power radio transceivers that connect to reflectors on the network. They are simple “gateways” that take the digital data from a radio and process it so that it may be streamed on the Internet.  They are purely digital and have no ability to process analog audio – that’s all done by the radio!

Do you need a hotspot for DMR?

A prerequisite for participation besides an assigned DMR-ID is the availability of a DMR-capable repeater within range. If there is no repeater in your range, you have the possibility to get the relay "in your own four walls" with the help of a "hotspot".

I am not going to go into full detail here regarding a hotspot.  Die videos underneath provide more than enough information on what a hotspot is and also the different hotspots.

Videos:

What is a Ham Radio Hotspot | Digital Voice Ham Radio - Ham Radio 2.0


Build your own DMR/DStar/Fusion hotspot for CHEAP – Dennis AD6DM


MMDVM Hotspots - What you need to know - VK4NGA


Now that we know what a hotspot is and what it is used for, I will provide you with more information on my hotspot before I go into the problems I recently experienced and how I fixed them.

About five years ago I bought my first DMR HT radio.  It is a TYT MD380 UHF Radio and  at the same time I also bought a Hytera MD785G UHF Mobile Radio which I bought secondhand from a radio amateur.  Both these radio were like new but I had one problem.  I did not have a hotspot nor a DMR repeater in my area.  I had to buy a hotspot to be able to utilize both radios for DMR.

I decided to import the hotspot from China as this is where I could source it cheaply.  The MMDVM Hotspot is called a Jumbospot which included a Metal Case, OLED screen and Antenna.
 

Features:

  1. High performance 32-bit ARM processor

  2. Black metal case

  3. Supports DMR, P-25, D-Star and System Fusion

  4. Onboard LEDs to show status (Tx, Rx, PTT, Mode)

  5. Up to 10mW RF power.

  6. Size and Weight7 x 3 x 2.5 cm and 50g

Installation and Setup: 

The only other items I needed was a Pi Zero, SD Card and the Pi-Star Firmware.  These I sourced locally.  To cut it short I installed and plugged everything together and I was up and running in no time.  The hotspot worked like a dream although is was a bit sluggish at boot up.  This I attribute to the Raspberry Pi Zero V1.3.  I later switched to a Raspberry Pi 3b and a 3-D Printed case for the hotspot. The 3b is far quicker than the Zero. It booted in no time. 

Hot plugging because of Loadshedding killed my hotspot:

Everything went well until one day a spat of loadshedding/ caused the Pi to "freeze".  I could not shut down the hotspot (yes it was still running) other than to hot-uplug the power.  This is where all the trouble started and here is a warning:  Never ever hot-plug or unplug your Hotspot Raspberry Pi Power Plug or Ethernet plug.  This can and in my case caused a few nasty issues which I eventually solved after hours of fiddling around and re-installing new firmware.  I also found out the hard way that, do not run your hotspot during loadshedding if you do not have a battery back-up (UPS) and a reliable Internet connection.

Problems and solution:

Lets get to the real problems and the solution.   Last week I decided to install a Raspberry Pi Zero 2 W board as I needed the Pi 3b for another project.  In any way to use a Pi 3b with a Jumbospot is really a waste of resources.  I also decided to install everything in the original metal case.  When I installed the first Pi Zero (V1.3) I saw that the bottom of the Pi PCB was nano micros away from the metal surface of the case.  Way back then I used insulation tape to prevent the PCB from making contact with the metal.  This surely did the trick.  I installed the Pi Zero 2 and the JumboSpot PCB into the metal cabinet.  Screwed everything in place and closed the lid.  Added the antenna and plugged everything in.  Switched on and used the radio to access DMR via the hotspot.  Everything worked great.

After about half an hour I wanted to use the radio on TG91.  I tried to activate TG91 but nothing happens.  The Radio TX and the hotspot TX and RX lights comes on but nothing else.  No TX/RX, audio or OLED Screen activity forthcoming from the hotspot or the radio.  I could however excess the Pi-Star Firmware via SSH and the Dashboard.  BrandMeister also indicated that all is well under My Devices and the Logs did not give any errors.  Rebooting did not result in any change.  I had to shutdown the hotspot and then restart it after about 5 minutes.  After startup the hotspot would work flawlessly for about 5 minutes and then the same problem occurred as discussed supra.  It point blank refuses to work after 5 minutes.  Needless to say I looked for all sorts of things in the firmware that could cause this problem.  I updated and upgraded but the problem remained. I even re-installed an older version and the latest version of the Pi-Star Firmware.  No joy. I tried everything that I found online but to know avail.  The hotspot was like a donkey that did not want to be move.

Well the only choice was to go back to the Pi3 b.  This resulted in further issues.  Now BrandMeister indicate that the password was not recognized or wrong.  The funny part is that in My Devices on the BrandMeister website the connection under the hotspot ID was green and on the main Pi-Star dashboard everything was green that should be green.  I changed the password to a new one.  This also did not resolve the issue.  I decided to ask on the Amateur Radio 101 Telegram Group if anybody experienced the same issue at some stage or the other.  Nope this seems to be a first.  I received a few pointers from Christie ZS4CGR and Curtis ZS6CMO.  It was getting late and I decided to follow the advise of Christie which suggested that it could be the Internet aka loadshedding that caused the problem as he and other experienced intermittent Internet connections on that specific day.

Shutting everything down I decided to call it a day and decided that I would give the hotspot another try early the next morning when the Internet seems to be more reliant.  Before I moved out of the Shack I decided to revert back to the Raspberry Pi Zero 2 and the metal cabinet.  Everything installed I closed the Shack door and went to bed.

Do or die:

Early the next morning around 04h00 I was up and ready in the Shack.  Either it works or it goes to the dust bin or junk box.  Needless to say nothing has changed the problem still remained.  Sitting back in my chair I looked at the metal cabinet and a thought came to mind.  I will remove the lid and fire the hotspot up.  Well nothing happened,  still the same result as the day before, but with a new issue. The OLED Screen would not light-up. It stopped working.  This is now really getting bad.  I shutdown and disconnected all the cables.  Looking at the JumboSpot PCB another thought came to mind. Why would the OLED not light-up as it did the day before. Nothing has changed overnight hardware or firmware wise. I hauled out a magnifying class and started to examine the PCB. 

Joy and Jubilation.....It works!!

All the solder joints and OLED Screen looked fine but when I looked in underneath the OLED Screen PCB from the side a light bulb moment appeared.  Difficult to see I decided to use a small leverage screwdriver to carefully lift the OLED Screen PCB up from the JumboSpot PCB about 2mm in height.  Plugged everything back in and together and started the hotspot.  Well it booted OK and worked fine but what will happen after a 5 minutes time lapse?  Will the donkey attitude still be there.  Time will tell.  Five minutes passed and I anxiously pressed the PTT.  Low and behold the hotspot jumped into action.  After 10 minutes and later 20 minutes the hotspot was still working as it should.  No errors and the donkey was up and running.  Joy at last!!  I checked all the logs for errors but there were none and the hotspot is still up and running now nearly 3 days without any issues.  Problems solved!!

What caused this erratic behavior and errors?

In my opinion the plugging from one raspberry pi to another must have over time caused the OLED Screen PCB to move down a fraction touching the JumboSpot PCB slightly at first and then "killing" it eventually when I moved back to the Pi Zero 2, the evening before the OLED completely "died".  To prevent the OLED Screen PCB from pressing against the JumboSpot PCB I installed two homemade plastic spacers between the two boards.  (See the photo with red circles in this regard)  Thankfully nothing was damaged and all the Pi's, OLED and JumboSpot is working as they should.

Hope this helps somebody that experience the same issues

I hope that this topic might be of assistance to others who might in future experience the same issues as I did.  I would however suggest that you add the plastic spacers when you first install/build the Jumbo Spot Hotspot.  This will save you many hours of fault finding and frustration.  Despite all the issues I must admit that I learned a great deal trying to solve the issues.  Sometimes it is worthwhile when something like this happens as you learn and gain very useful experience on how hotspots work.

Images:  (Click on images for larger view.)


New ZS6CM0 70cm AllStarLink Repeater - Alberton

(Click on images for larger view.) Curtis ZS6CMO recently completed his 70cm AllStarLink Repeater.  In the video the repeater was connected ...