Showing posts with label Load-Shedding. Show all posts

Sunday, March 2, 2025

My Son Plaas in die Vrystaat - Christi ZS4CGR


Hier volg interessante inligting rondom die gebruik van hernubare energie soos verskaf deur Christi ZS4CGR.  Soos gesien kan word het hy die "doen dit self" rigting gevolg en wek hy genoeg krag op om sy hele huishouding en amateur radio hok van krag te voorsien.  Dankie Christi dat jy die besonderhede rondom jou "son plaas" en opbou na son energie en onafhanklikheid met ons gedeel het.


Opbou na Sonenergie en Onafhanklikheid – Christi ZS4CGR

My pad na sonenergie het in 2004 begin. Ons was van plan om op die banke van die Oranjerivier bokant Aggenys ’n plaas te koop. Op die grond was nog nooit twee bakstene op mekaar nie. Kaal landelike grond. 6500Ha groot.

Ek het my eerste panele 2 x 70W gekoop teen R2500, drie tweedehandse 104 Ah batterye en ’n 400W 'ou tipe' omsetter. Vir ’n jaar was dit ons enigste energie. Daarmee het ons een rekenaar kon bedryf vir maks. een uur per dag. Drie florescent 8W kar 'lead lights' was ons lig in die drie army tente wat ons 'huis' was. Stoof en karavaan vries kassie was op gas. Warm water uit die donkie was net wintertyd nodig. Terloops, somer temperature in die skaduwee het 48°C bereik en in die tente tot 57°C. So teen 3h soggens het die temperatuur onder 32° gedaal en kon ons gou bietjie slaap voor die son weer opkom.

Hierna het ek vir drie jaar in die landbou gewerk en toe stuk-stuk getrek na die familieplaas waar ons nou voltyds woon.

In 2006 het ek begin speel met alternatiewe warm water stelsels (wat ons nou nog gebruik). Swart PVC klas drie 25mm pyp, 200m lank, opgerol en bedek met tonnel plastiek (teen wind -wat so 4j hou - sien foto). Geen opgaar houer nie, die druk van die watertenk voer die pyp en ons moet sorg dat ons voor sononder klaar bad en stort. Dag temperatuur van die water is byna konstant op 75°C, heel bruikbaar, heel jaar deur, behalwe op swaar bewolkte dae (omtrent 7 dae per jaar), dan gebruik ons warm water uit ’n 50ℓ geysertjie wat van die sonstelsel af warm gemaak word. Ons het tans ook 'blou pype' vir die kombuis en veldstort. Warm water is hier volop.

Dit is die agtergrond.

Net eers hoe al my son panele werk.

Ons panele is in 'bondeltjies' gebou oortyd, op ’n middel paal (pivot) sodat as die paneel regop staan die onderkant so 300mm van die grond af is. Hulle kan dus roteer. Dan kan die rame waarop hulle gebou is ook vertikaal gekantel word. As hierdie dubbel beweegbare metode gebruik word, lewer elke paneel tot 160% van ’n vas gemonteerde paneel se krag (dus eintlik ’n besparing is panele). Tans het ek agt individuele 'bondels'.

En ja ek verstel hulle met die hand omdat ek die tyd het en die oefening nodig het. As ons weggaan, draai ek hulle Noord tot ons terugkom.

Hier is my huidige 8 + 3 bondels:

2x 70W 12V Voer lood-suur batterye vir radio’s en ander 12V toerusting
2x 80W 12V Voer LiPO batterye en 5kW omsetter
6x 80W 12V Voer LiPO batterye en 5kW omsetter
2x 325W 24V Voer LiPO batterye en 5kW omsetter
4x 180W 12V Voer LiPO batterye en 5kW omsetter
2x 170W 12V Voer lood-suur batterye vir radio’s en ander 12V toerusting
1x 335W 24V Op karavaan dak foto
1x 225W 24V Op bakkie 'canopy'
1x 170W 12V Op bakkie 'canopy'


Hierdie 'bondels' was een-een aangeskaf, nie alles gelyk nie. Op die oomblik is die maks. lewering so 2.2kW.

Ek het baie lank gewerk met ’n motor battery bank van tot 15 batterye. So 3 jaar terug het ek ’n ou lood-suur 48V stelsel geskenk gekry, maar die 2V selle (24 selle) het nie ’n jaar gehou nie, waarna ek besluit het om oor te gaan op LiPO batterye. Omdat ek nie die LiPO batterye geken het nie, was ek geadviseer om 2x 3.7kW batterye te installeer, maar toe ek gaan sit en my somme maak, het ek die verskaffer gekontak en dit vermeerder na vier. En net ’n maand later het ek nog twee by gekoop, dus ses batterye van 3.7kW. Totaal nou 22kW. Terloops, 2.2kW bron vir 22kW batterye? Dit werk,
so 3½ uur se vol son en my laaier skakel af, alles is vol. En in bewolkte weer hou alles so drie dae voordat ek die Lister se hulp moet inroep.

Nou hier kom ’n interessante punt. Ek het gou agtergekom dat ek steeds nie genoeg rugsteun krag het na my sin nie, maar nog twee batterye sou meer as R30k kos, wat ek nie wou uitgee nie. Lank geloop en dink. Sien, ek het ’n gas yskas wat teen 300W konstant loop (die koste van gas was ’n groot deel van die motivering om oor te gaan op LiPO). Dit beteken 19kg gas per maand teen ongeveer R500/m. Maar die ou yskas kom al amper 15j saam met my en werk goed. Na heelwat dink het ek besef dat die uitweg was om die yskas te vervang i.p.v. batterye te koop. Die nuwe yskas gebruik net 80W en is nie konstant aan nie. Dit het 'veroorsaak' dat ek ook ’n kas vrieskas by gekoop het wat ook net 80W benodig. Die twee saam het minder as een battery gekos en verder nog R500/m se gas bespaar. ’n Goeie kompromie en my krag benodig het omtrent halveer.

Al ons gedagtes moet die volgende patroon volg: as jy nie jou inkomste kan vermeerder nie moet jy jou uitgawes verminder en as ek om my rondkyk, sny sal ons moet SNY.

Vir ’n stoof gebruik ons meestal ’n twee plaat stofie, ’n Elektriese plastiese ketel gebruik minder energie as ’n glas/metaal ketel omdat ek nie die glas/metaal hoef te verhit nie.

En hier is ’n wenner. Koop vit jou LV ’n nuwe druk-kook-pot die elektroniese soort. Hoekom? Want hy werk op 2bar druk (i.v.m. die oues wat op 1.2bar werk), maak taai vleis binne minute sag en gaar en gebruik baie minder krag en tyd as enige ander metode. Voordeel? Die LV 'smile'. Wat wil ’n LV hê? Warm water in die badkamer (en kombuis) en ’n gerieflike kombuis (en baie tyd vir haarself).

Nou kom ons by beligting.

Op Swartbas (plaas) het on 'lead lights' gebruik teen 8W elk.
Op Klein Kortlaagte (plaas) kon ons nie die 'luxury' bekostig nie. (tussen die twee het ek al my kapitaal 'verloor' deur 'diefstal').

Hier, het ek begin met een loodsuur battery (hier is ’n Lister, maar diesel kos geld) en kon dus nie die gewone ligte aandryf nie. Ek het ligte 'gemaak', ek het plastiese versierings-balle met fasette gekoop (O.D. 30mm), ’n gaatjie in geboor en ’n wit LED daarin monteer, drie in ’n ry met ’n weerstand vir stroom beheer en siedaar, hy werk van 12V af en gebruik 20mA. Gou was die hele huis 'belig'. Toe die 'strip LEDs' op die mark kom (of het ek dit ontdek?), het ek sistematies al die ou LED-balle vervang. Teen 50mA per lig. Ons het lank so gewerk, ons kon alles sien en doen wat nodig was. Laas jaar het ek op ’n verbetering afgekom. ’n Vriend wou sy neon lig vervanging (LED strip) waarvan die glas gebreek het weggooi, gou het ek hom oortuig om dit vir my te gee. By die huis het ek die krok met 'cable ties' op ’n 'dowel rod' vasgetrek nadat ek dit getoets het en hy werk nou nog in ons werkkamer (18W). Dit het my weer op ’n ander idee gebring. Ek het vir my van die neon vervangings buise (8W) gaan koop, ou geblaasde lampe se bajonet stert afgehaal en bedraad op die LED buis. Nou hang hulle vertikaal in die plek van gewone lamp aanhegtings en dit werk goed.
Nou-ja, dit alles kom oor die verloop van 18 jaar, sien, dis nie nodig om ’n hoop geld op een slag uit te gee nie, maar maak net ’n begin, dit sal self kleintjies kry, nes radio’s en antennas.

73

Christi ZS4CGR 


Fotos  (Klik op fotos om te vergroot.)


Thursday, February 27, 2025

Eskom Loadshedding Solutions - Raspberry Pi Router/Modem "Watchdog" Project: Testing Internet Connection (Part 3)


 Image:  ZS1I AllStar Hub, 145.550 Echolink Simplex Link and ZS-Link SVXLink Reflector

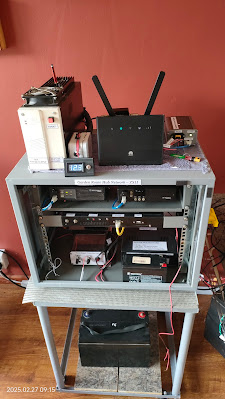
With the recent loadshedding experienced I decided to consolidate several projects that were left hanging due to other more urgent projects or the fact that loadshedding was suspended and there was not really a need to finish such projects.  Well this time around I decided to make a list of unfinished projects and whether loadshedding is suspended early, these projects must be finalized irrespective if there are other more urgent projects.  One such project is the Raspberry Pi Router/Modem "Watchdog" Project.  I received requests from fellow radio amateurs to provide more information setting up the "Watchdog" and what was the end result in connecting it to an AllStar node and LTE Modem/Router. Part 1 and Part 2 is available by clicking on the specific part.

What is the project all about?  In short I needed an automated “watchdog”  to tell me if the Internet was up  or down and if  down to automatically connect to the Internet once it is back up and running again especially during and after loadshedding. (power outages)  If it is up then there is no further action to be taken. In Part 3 I will be looking at a few Linux and Setup commands for this project.  Once you finished constructing the "Watchdog" it is time to "wake it up" and getting it to watch the Internet for connection outages or confirm that it is up and running.

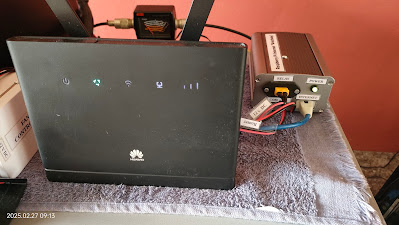
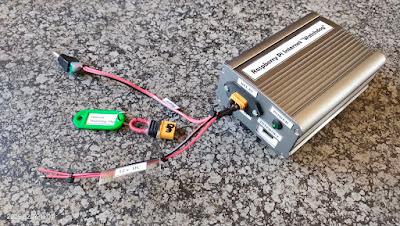
Let's first look at our connections that must be made for the "Watchdog" to work correctly.  

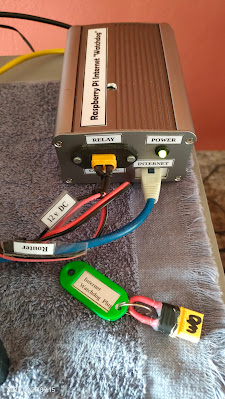
Cables needed:

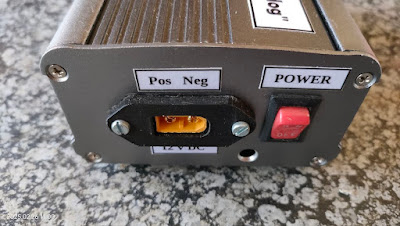
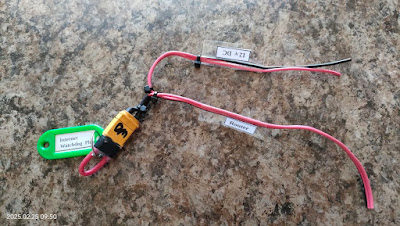
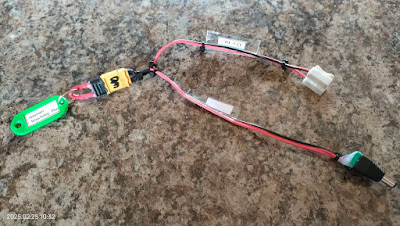
1.  12 v DC Cable to power the "Watchdog"

2.  Ethernet Cable coming from the Router/Modem that you will be monitoring.

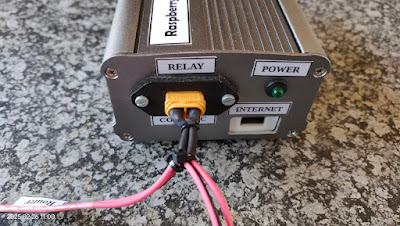
3.  Relay Control Cable.  One end of the cable connects to the Router.  The other end connects to 12v DC going to the Router and the third connection is to the "Watchdog" relay connection which is  Com - NC wired.

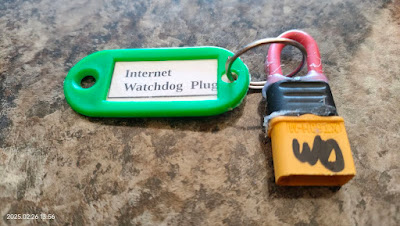
4.  Internet "Watchdog" Bridge Plug -  This is needed when the "Watchdog" is not connected to the Router/Modem.  It is just a wire bridge to give  12 v DC connectivity.

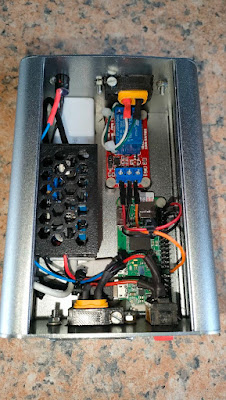
See images for clarity in this regard.

Once you have connected all the cables it is time to switch the unit on.  Wait a few minutes and then retrieve the IP address by either looking in the router/modem or by using software to retrieve the IP address. 

I use VNC to get access to the Raspberry Pi.  Enter  the IP address in VNC as well as your username and password which you must have created when installing the OS.  Once you have logged into the Raspberry Pi you must install Python 3.11.1 if not already installed.  If not installed do a Google search on how to install Python on a Raspberry Pi.  We need Python 3 to run the Internet Watchdog program.  Once Python is installed and you rebooted we need to update the Raspberry Pi.   Open a Terminal window in the Raspberry Pi.

Enter:

$ sudo apt update (enter)

When all the updates are downloaded and installed use clear and enter to clean the terminal window.

We will now write the two script files as shown in Part 2.   Keep Part 2 open in another tab of your browser as we will copy the contents of the two script files into two separate files.  To create each file you will have to follow the procedure listed underneath.

$ sudo su (enter)

$ cd /home/pi (enter)

To create and write a new Python script with Nano:

In the terminal window use:

$ nano filename.py  In our case replace filename with relay_test.py

Copy and paste the relay_test.py in the second browser to relay_test.py  Once copied
press CTRL+S to save the file.
press CTRL+X to exit Nano and come back to the terminal.
Your relay_test.py script file is now created.  Do the same with the relay_final.py script file.  Also open  relay_final.txt and relay_test.txt files by using the above nano method.  Do not copy and paste anything in the relay_final.txt or relay_test.txt files.  Just save them without anything in it.
 
The four files you created will be listed in the /home/pi directory.
You should still be in root@raspberrypi:/home/pi#

Use ls command to list the files.  The files will be listed as:

relay_test.py 
relay_final.py
relay_final.txt
relay_test.txt

Now go to the Applications Menu of the Raspberry Pi (far left top of the screen)
Look for Thonny Python under programming.
Open Thonny
The Thonny Python Program will open 
Click File - Open - select relay_test.py
Click OK
relay_test.py script file will open in Thonny Python
Again click file
Select Open
Click on relay_final.py
Click OK
relay_final.py script file will open in Thonny Python

Time to test if the Internet is UP or DOWN using relay_test.py script

In the Thonny Python Program select relay_test.py  The script has a false IP address to simulate that the Internet is down.

Go to the green round icon with the black triangle pointing  to the right
Click on the icon to run the relay_test.py script
Output will be displayed in Shell (Bottom of Thonny)
 
Output:
 
Date and Time is: 2025-02-24  15:44:12.382124
Testing Internet connection using Ping
PING 1.51.17.1 56(84) bytes of data
(Note the 1.51.17.1 is a fake IP address) to simulate  that the Internet is down)
--- 1.51.17.1 ping statistics ---
5 Packets transmitted, 0 received, 100% packet loss, time 135 ms

1.51.17.1 Internet connection failure
Turning off power to router
Waiting 1 minute to turn router back on
Power up and Reboot router
Nearly there - wait another while!  (Till  >>> appear)

It is clear from the above that we do not have a working Internet connection.  Internet is down!
 
You can replace the IP address in the above script with 8.8.8.8 and again test if the Internet is UP or DOWN.  The output would reflect that the Internet is UP.  No need to change the IP.  We will use the final script to get the "Watchdog" up and running.
 
Next we will use relay_final.py script to find out if the Internet is UP or Down. 

In the Thonny Python Program select relay_final.py 

Go to the green round icon with the black triangle pointing  to the right
Click on the icon to run the relay_final.py script
Output will be displayed in Shell (Bottom of Thonny)
 
Output:
 
Date and Time is 2025-02-24  15:59:35.420916
Testing Internet Connection using Ping
Ping 1.1.1.1 (1.1.1.1) 56 (84) bytes of data
64 bytes from 1.1.1.1; icmp_seq=1 ttl=57 time=66.0ms
64 bytes from 1.1.1.1; icmp_seq=2 ttl=57 time=48.6ms
64 bytes from 1.1.1.1; icmp_seq=3 ttl=57 time=47.4ms
64 bytes from 1.1.1.1; icmp_seq=4 ttl=57 time=48.5ms
64 bytes from 1.1.1.1; icmp_seq=5 ttl=57 time=45.8ms
 
---1.1.1.1 ping statistics ---
5 packets transmitted, 5 received, 0% packet loss, 12 ms
rtt vnin/avg/mox/mdev=45.826/51.277/66.032/7, 446 ms
 
1.1.1.1  Internet connection success.  No further input needed.
 
If the Internet was down the output would be similar to the output we received in relay_test.py simulation.
 
I drilled an inspection hole on the top of the cabinet to view the two LED's on the relay module.  Under normal operation there is a green led that indicates that there is power to the relay module.  There is another relay that will indicate whether the Internet is up or down. (See videos in Part 1)

If only the green power led on the relay module is on then the Internet is up and running.
If the green power led and a red led is lit on the relay module then the Internet is down.

You can now easily see if there is any issues by just looking through the inspection hole.

Finally:  We now need to setup the crontab -e file to run the final script every 10 or 30 minutes (you choose the time interval)
 
Open a Terminal window

Type after $:
crontab -e (enter)
 
Once file open go to the last entry line in the file and enter the following:
 
#*/10 * * * * python3 /home/pi/relay_final.py
#*/2 * * * * python3 /home/pi/relay_final.py >> /home/pi/relay_final.txt 2&>1
#*/2 * * * * python3 /home/pi/relay_test.py
#*/2 * * * * python3 /home/pi/relay_test/py >> /home/pi/relay_test.txt 2&>1
 
We have four options/settings:
 
1.  Running relay_find.py script every 10 minutes
2.  Running relay_find.py script every 2 minutes with output to relay_final.txt file
3.  Running relay_test.py script every 2 minutes
4.  Running relay_test.py script every 2 minutes with output to relay_test.txt file
 
Note:   Options 2 and 4 should not be activated to run continuously as output data can quickly fill up your SD Card.  Just use it for test purposes only.
 
The relay_final.py script will run every 10 minutes and should be activated by removing the # in front of  */10 ------ etc
 
If you go to cd /home/pi (enter) you will see the text (txt) files listed.  If you activated relay_final.py and relay_text.py while testing crontab you can click on the txt file and you will be able to view output when running either script file.  Only run one script txt file at a time.  How ever there is another way to check if crontab ran successfully.

In Terminal use:

grep CRON /var/log/syslog

Note:  After testing script files and txt files ensure that only relay_final.py is activated.  The three other crontab entries should be de-activated by putting an # in front of each entry. 

To check crontab content after closing it you can type in Terminal:

$ crontab -l

Crontab content will be displayed in the terminal window.

This final setup will activate the Raspberry Pi Router "Watchdog" and you will now be able to use this setup/project to automatically monitor the Internet continuously.
 
Enjoy!!


Video:


Images:  Click on images for larger view


Sunday, February 2, 2025

Loadshedding and obscure "issues" can cause hick-ups to the ZS-Link Network


Just a short notification that outages might occur during or after loadshedding due to non access to certain networks or servers.  The ZS Link Network in Mossel Bay is fully equipped to handle loadshedding day or night.  The problem arise that connections to other networks and servers might be down.  This is beyond the control of the administrator of the SCP ZS-Link Network.

Currently the DMR Bridge in Mossel Bay is affected and I have disconnected it from the HUB Network.  Once the service is restored I will reconnect the DMR Bridge.  Other Internet network services are currently up and running.

Now here is another aspect to take note of.  The VOIP side of the SCP ZS-Link Network is left running 24/7.  I recently noticed that for some reason or other obscure midnight activity causes problems iro the BrandMeister Service.  I am currently working through the various logs to see what is happening throughout the night when I do not monitor the VOIP network.

I have decided to implement the following measure:

The complete ZS1I HUB Network and other Services like the DMR Bridge will be available every day from 05h00 to 21h00 hours until further notice.  This will allow me to monitor the system full-time for any problems and possible interruptions. 

In the meantime I will work through the logs to find out more.  I really hope that the logs will reflect that it is normal network outages instead of malicious intent that result in the issues.

Monday, February 19, 2024

Kosbare Battery Wenke deur Christi ZS4CGR

So tydjie gelede  was die klank opname op die Amateur Radio 101 groep geplaas. Die opname bevat kosbare wenke oor hoe jy die leeftydperk van sekere battery kan verleng asook talle belangrike voorstelle rondom verskillende batterye vir sonkrag gebruik deur radio amateurs.  Luister gerus na die opname en leer meer oor die hantering en instandhouding van batterye.

Ek wil van die geleentheid gebruik maak om vir OK Christi ZS4CGR te bedank vir die beskikbaarstelling van die klank opname en ook die manier hoe hy praktiese inligting met ons deel.  Nie 'n klop teoretiese retoriek nie maar inligting wat verstaanbaar is ook vir beginners.  Ek is seker dat julle sal saamstem dat hierdie opname baie nuttige inligting bevat.

Friday, February 16, 2024

Fixing a 12v DC to 220v AC "5000 watt" Chinese Power Inverter


I am not going to explain how to fix a Chinese inverter in this Blog posting.  I am however going to tell you what was wrong with it and what to be very careful about when you have one or similar Chinese inverter.  Now let me make it very clear this is not an inverter which you would install in your household.  The reason is quite simple,  it is not a good product and you run severe risks to damage equipment or even worse cause a fire that can destroy you house.  In my opinion I would rather use this unit outdoors in an emergency power situation.  Please note it is not waterproof and care must be taken to protect it during wet or damp conditions.   Take note:  I do not take any responsibility for any mishaps if you buy such an inverter for whatever purpose or reason.

I had this inverter installed on a trolley and it's main function was to run all my LED lights, inside and outside the house during loadshedding periods.  That's all!! No air-fryer, toaster, microwave etc.  This inverter ran from a 100 Ah Lead Acid Battery for nearly a year without any problems even during Stage 6 loadshedding phases.

When I upgraded to a self built, larger and better trolley inverter system my son asked if he could have the Chinese "5000" watt Inverter.  I told him that in my opinion this is not a "5000" watt inverter.  I am of the opinion that the peak wattage is not near 5000 watts no matter what the labels or manual says.  By now one should know that specifications on certain Chinese brands are a sales gimmick.  I  warned my son to draw no more than 2000 watts from the inverter and only in short periods.  Well some people listen to advice others ignore it and rather believe the labels on a product.  

A week later I received a message that the inverter just died one night while in use.  No errors, warnings or LED flashing.  It was dead!!  Asked how many power did they draw, I got a answer that he does not know as the inverter works from the garage to the house.  He brought the inverter to the Shack one day and ask if I would have a look at it.  I opened it up and first look at all the fuses.  None was blown - strange?  Then I tested all the input Mosfet's and components on the input side of the unit.  I could not find any faults.  Well on to the output side.  I removed the four output Mosfet's, measured them and found them all to be open circuit and faulty.  Strange but that is what I found.  No fuses blown and no alarms??  This raises big questions if you look at all the protection that is advertised. None seemed to have protected the unit.  Now to find replacement Mosfet's.  The cheapest replacements would have cost me over R900.00.  My son was not willing to pay that price and the unit found a new use as a "door stopper', just joking.  Before I shelved the unit I noticed that there was an inscription on the PCB that indicate that the unit only outputs 1500 watts.

Moral of the story is that 5000 watt stated in the manual and on the outside label was not correct.  I shelved the project and would use it for parts.  In January 2024 I found 6 Mosfet's for the unit at R63.00 each.  I ordered the Fet's and fixed the inverter today.  It is up and running again but this time around I will adhere a label clearly stating that this unit can only deliver 1500 Watts Output.

All that is left is to thoroughly clean the inverter.  My apologies for the dust and dirt on the unit in some photos but I did not want to clean the unit until I was sure it works as it should.  The fan needs also to be cleaned and oiled as it is making a noise the first few second after starting the unit.

There you have the story of the "5000 watt" Chinese Inverter.  DO NOT believe any insignia on Chinese electronic equipment!! 


Click on images to enlarge. Please excuse the dust and dirt on the last image but the reason being as explained supra.

Saturday, November 25, 2023

Intermittent problems with my Jumbo Digital Radio Hotspot


Image: ZS1I Jumbo Hotspot using a Raspberry Pi 3 b
 
Before I provide more information about the problems I experienced with my Digital Radio Jumbo Hotspot, we need to look at the following: 

Intro:

In the world of DMR, there are two ways to gain access to the now worldwide network. One is a repeater, the other is using a hotspot. Which method is best is determined by several factors. One of the main factors is how far you are from the local repeater. If you are not within range of a repeater, a hotspot may be your only choice.

Both a hotspot and a repeater can be used to connect to a DMR network. So let's take a look at the networks.

The Brandmeister Network is the commonly associated with hotspot operation, while the DMR-MARC network is associated more with repeater operation.

What is a digital radio hotspot?

“Hotspots” are digital-only, small, low-power radio transceivers that connect to reflectors on the network. They are simple “gateways” that take the digital data from a radio and process it so that it may be streamed on the Internet.  They are purely digital and have no ability to process analog audio – that’s all done by the radio!

Do you need a hotspot for DMR?

A prerequisite for participation besides an assigned DMR-ID is the availability of a DMR-capable repeater within range. If there is no repeater in your range, you have the possibility to get the relay "in your own four walls" with the help of a "hotspot".

I am not going to go into full detail here regarding a hotspot.  Die videos underneath provide more than enough information on what a hotspot is and also the different hotspots.

Videos:

What is a Ham Radio Hotspot | Digital Voice Ham Radio - Ham Radio 2.0


Build your own DMR/DStar/Fusion hotspot for CHEAP – Dennis AD6DM


MMDVM Hotspots - What you need to know - VK4NGA


Now that we know what a hotspot is and what it is used for, I will provide you with more information on my hotspot before I go into the problems I recently experienced and how I fixed them.

About five years ago I bought my first DMR HT radio.  It is a TYT MD380 UHF Radio and  at the same time I also bought a Hytera MD785G UHF Mobile Radio which I bought secondhand from a radio amateur.  Both these radio were like new but I had one problem.  I did not have a hotspot nor a DMR repeater in my area.  I had to buy a hotspot to be able to utilize both radios for DMR.

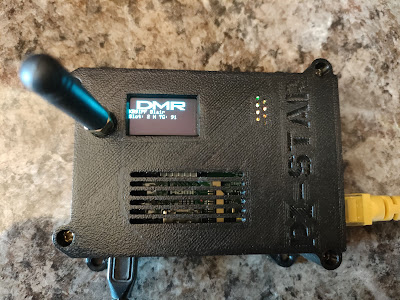
I decided to import the hotspot from China as this is where I could source it cheaply.  The MMDVM Hotspot is called a Jumbospot which included a Metal Case, OLED screen and Antenna.
 

Features:

  1. High performance 32-bit ARM processor

  2. Black metal case

  3. Supports DMR, P-25, D-Star and System Fusion

  4. Onboard LEDs to show status (Tx, Rx, PTT, Mode)

  5. Up to 10mW RF power.

  6. Size and Weight7 x 3 x 2.5 cm and 50g

Installation and Setup: 

The only other items I needed was a Pi Zero, SD Card and the Pi-Star Firmware.  These I sourced locally.  To cut it short I installed and plugged everything together and I was up and running in no time.  The hotspot worked like a dream although is was a bit sluggish at boot up.  This I attribute to the Raspberry Pi Zero V1.3.  I later switched to a Raspberry Pi 3b and a 3-D Printed case for the hotspot. The 3b is far quicker than the Zero. It booted in no time. 

Hot plugging because of Loadshedding killed my hotspot:

Everything went well until one day a spat of loadshedding/ caused the Pi to "freeze".  I could not shut down the hotspot (yes it was still running) other than to hot-uplug the power.  This is where all the trouble started and here is a warning:  Never ever hot-plug or unplug your Hotspot Raspberry Pi Power Plug or Ethernet plug.  This can and in my case caused a few nasty issues which I eventually solved after hours of fiddling around and re-installing new firmware.  I also found out the hard way that, do not run your hotspot during loadshedding if you do not have a battery back-up (UPS) and a reliable Internet connection.

Problems and solution:

Lets get to the real problems and the solution.   Last week I decided to install a Raspberry Pi Zero 2 W board as I needed the Pi 3b for another project.  In any way to use a Pi 3b with a Jumbospot is really a waste of resources.  I also decided to install everything in the original metal case.  When I installed the first Pi Zero (V1.3) I saw that the bottom of the Pi PCB was nano micros away from the metal surface of the case.  Way back then I used insulation tape to prevent the PCB from making contact with the metal.  This surely did the trick.  I installed the Pi Zero 2 and the JumboSpot PCB into the metal cabinet.  Screwed everything in place and closed the lid.  Added the antenna and plugged everything in.  Switched on and used the radio to access DMR via the hotspot.  Everything worked great.

After about half an hour I wanted to use the radio on TG91.  I tried to activate TG91 but nothing happens.  The Radio TX and the hotspot TX and RX lights comes on but nothing else.  No TX/RX, audio or OLED Screen activity forthcoming from the hotspot or the radio.  I could however excess the Pi-Star Firmware via SSH and the Dashboard.  BrandMeister also indicated that all is well under My Devices and the Logs did not give any errors.  Rebooting did not result in any change.  I had to shutdown the hotspot and then restart it after about 5 minutes.  After startup the hotspot would work flawlessly for about 5 minutes and then the same problem occurred as discussed supra.  It point blank refuses to work after 5 minutes.  Needless to say I looked for all sorts of things in the firmware that could cause this problem.  I updated and upgraded but the problem remained. I even re-installed an older version and the latest version of the Pi-Star Firmware.  No joy. I tried everything that I found online but to know avail.  The hotspot was like a donkey that did not want to be move.

Well the only choice was to go back to the Pi3 b.  This resulted in further issues.  Now BrandMeister indicate that the password was not recognized or wrong.  The funny part is that in My Devices on the BrandMeister website the connection under the hotspot ID was green and on the main Pi-Star dashboard everything was green that should be green.  I changed the password to a new one.  This also did not resolve the issue.  I decided to ask on the Amateur Radio 101 Telegram Group if anybody experienced the same issue at some stage or the other.  Nope this seems to be a first.  I received a few pointers from Christie ZS4CGR and Curtis ZS6CMO.  It was getting late and I decided to follow the advise of Christie which suggested that it could be the Internet aka loadshedding that caused the problem as he and other experienced intermittent Internet connections on that specific day.

Shutting everything down I decided to call it a day and decided that I would give the hotspot another try early the next morning when the Internet seems to be more reliant.  Before I moved out of the Shack I decided to revert back to the Raspberry Pi Zero 2 and the metal cabinet.  Everything installed I closed the Shack door and went to bed.

Do or die:

Early the next morning around 04h00 I was up and ready in the Shack.  Either it works or it goes to the dust bin or junk box.  Needless to say nothing has changed the problem still remained.  Sitting back in my chair I looked at the metal cabinet and a thought came to mind.  I will remove the lid and fire the hotspot up.  Well nothing happened,  still the same result as the day before, but with a new issue. The OLED Screen would not light-up. It stopped working.  This is now really getting bad.  I shutdown and disconnected all the cables.  Looking at the JumboSpot PCB another thought came to mind. Why would the OLED not light-up as it did the day before. Nothing has changed overnight hardware or firmware wise. I hauled out a magnifying class and started to examine the PCB. 

Joy and Jubilation.....It works!!

All the solder joints and OLED Screen looked fine but when I looked in underneath the OLED Screen PCB from the side a light bulb moment appeared.  Difficult to see I decided to use a small leverage screwdriver to carefully lift the OLED Screen PCB up from the JumboSpot PCB about 2mm in height.  Plugged everything back in and together and started the hotspot.  Well it booted OK and worked fine but what will happen after a 5 minutes time lapse?  Will the donkey attitude still be there.  Time will tell.  Five minutes passed and I anxiously pressed the PTT.  Low and behold the hotspot jumped into action.  After 10 minutes and later 20 minutes the hotspot was still working as it should.  No errors and the donkey was up and running.  Joy at last!!  I checked all the logs for errors but there were none and the hotspot is still up and running now nearly 3 days without any issues.  Problems solved!!

What caused this erratic behavior and errors?

In my opinion the plugging from one raspberry pi to another must have over time caused the OLED Screen PCB to move down a fraction touching the JumboSpot PCB slightly at first and then "killing" it eventually when I moved back to the Pi Zero 2, the evening before the OLED completely "died".  To prevent the OLED Screen PCB from pressing against the JumboSpot PCB I installed two homemade plastic spacers between the two boards.  (See the photo with red circles in this regard)  Thankfully nothing was damaged and all the Pi's, OLED and JumboSpot is working as they should.

Hope this helps somebody that experience the same issues

I hope that this topic might be of assistance to others who might in future experience the same issues as I did.  I would however suggest that you add the plastic spacers when you first install/build the Jumbo Spot Hotspot.  This will save you many hours of fault finding and frustration.  Despite all the issues I must admit that I learned a great deal trying to solve the issues.  Sometimes it is worthwhile when something like this happens as you learn and gain very useful experience on how hotspots work.

Images:  (Click on images for larger view.)


Friday, October 20, 2023

Winlink kom tot die "redding" van OK Christie ZS4CGR


So 'n tyd gelede het ek en Christie ZS4CGR 'n gesprek gehad rondom die uiters wisselvallige Internet diens wat hy op die plaas van tyd tot tyd ervaar het tydens veral beurtkrag maar ook sommer in die algemeen.  Hy het my meegedeel dat die boere en hyself in die omgewing waar hy woonagtig is sommer vir dae sonder Internet en selfoondienste is.  Hy is by een van die groot Internet verskaffers die enigste een wat hy is sy area ontvang.  Van landlyn dienste is daar nie eers 'n teken nie.  Soos ons almal weet maak 'n boer 'n plan wanneer hy 'n probleem ervaar wat opgelos moet word.  So is daar ook ander dele in die land wat nie normale Internet verbindings het nie, maar ook geen verbindings tydens beurtkrag nie.  Ons het ook reeds ervaar dat amateur radio nadelig beinvloed word wanneer beurtkrag toegepas word en ek gaan nie nou hieroor uitbrei nie aangesien ek dit reeds vele male verduidelik het in die verlede.

Ek was die afgelope tyd besig om te kyk na alternatiewe kommunikasie vir die GRHub Netwerk wanneer Internet of selfoon kommunikasie in duie stort tydens beurtkrag.  Ek hoor talle se maar gebruik amateur radio toerusting.  Dit is onveilbaar.  Ja ek kan dit gebruik maar ek wou sekere kommunikasie middels en sagteware gebruik en nie net RF radio nie.  Meer hieroor in 'n toekomstige plasing.  Kom ons kyk wat het die afgelope weke met Ok Christie gebeur.

Ek ontvang die volgende selfverduidelikende Winlink epos vanaf Christie op  die 13 Oktober 2023.  Nee nie op my Winlink stelsel nie, maar via my gewone gmail epos adres.

Noem dit 'n "nood oproep" vanaf die plaas  want kyk ons as radio amateurs gee om vir mekaar as ons nie gereeld van mekaar hoor nie.  Ek kon toe die lede van die Amateur Radio 101 groep inlig hoekom ons nie van Christie iets hoor nie.

Ek het besluit om in antwoord op die epos vir Christie 'n Winlink Epos terug aan hom te stuur via sy winlink epos adres.  Ek het die epos met PAT Winlink wat op 'n Raspberry Pi geinstalleer was gestuur asook 'n beeld afdruk (image) van sy oorspronklike epos.  Wel op 15 Oktober 2023 is die PAT Winlink epos afgestuur insluitende die aanhangsel.  Ek het die epos ook ge- "CC" na my gmail epos toe.  Sonder enige probleme is die epos aan OK Christie gestuur.   Winlink werk en dit werk goed ook wanneer daar geen Internet koppeling is nie.

En so kan mens in verbinding bly met radio amateurs op plekke waar daar nie Internet of selfoon ontvangs is nie.  Speel bietjie rond met Winlink.  Dit is beslis die moeite werd om dit deel te maak van jou arsenaal van sagteware en hardeware.


Klik op bostaande fotos om te vergroot.

Audio Insetsel:   Klik  HIER

Monday, August 14, 2023

Revisited: Mossel Bay AREDN 5.8 and 2.4 Ghz Mesh Network once again active!! (Part 1)

The Mossel Bay AREDN 5.8 and 2.4 Ghz Mesh Network is once again active, but this time not only as an emergency data network.

Before you run away, read on,  you might be surprised about the new use for this Mesh Network. To those that might not know,  Mossel Bay "had" its own AREDN Mesh Network running from 2016 to 2020. 

What is AREDN all about?

By loading the AREDN®1 firmware in a outdoor wireless access point, you can join a ham radio network. It’s like the Internet but runs on ham radio frequencies, mostly in the 2.4, 3.4, and 5.8 GHz bands. By joining this network you can find and use all sorts of applications (known as “services”). Anything running on a server, like weather stations, web sites showing site conditions, email servers, etc can be provided as a service. There are also services that don’t rely on a browser: video streams, chat servers, VOIP PBXes, etc. The network can also be used to connect Winlink stations, Dstar and DMR repeaters, and Allstar devices. Pretty much any kind of service you can put on the Internet you can put on the AREDN hamnet, subject to the restrictions of the ham radio regulations.

Why would one run an AREDN Network in you local community, town or city?

I can provide you with an abundance of reasons but this is not the aim of this topic.  However here is a few links how AREDN was used during the 2017 Knysna Wildfires. 

From the above links it is quite clear that AREDN is a very useful "tool" during disasters and emergencies.  In 2018 AREDN was again used during the Haarlem Fire in the George area. Since 2019 to date the extent of disasters and emergencies were of such a nature that there was no need to use AREDN.  Thankfully this area is currently not a disaster prone area but one can never say that disasters or large emergencies cannot happen.

Now what is the purpose of this article then?

Another "disaster" reared it's ugly head when the country was plunged into darkness as a result of Phase 6 Eskom Loadshedding.  Without going into great detail I deem it necessary to explain in short what Phase 6 entails for our overseas readers.

Stage 6 load shedding is the highest ever experienced in South Africa. This stage means that 5000 MW to 6000 MW of power must be shed in order to prevent the national grid from collapsing. If the power grid were to collapse, it would leave Eskom having to begin additional, unscheduled power cuts whenever needed, and outside of existing schedules. However, stage 6 load shedding means power cuts are scheduled over a 4-day window to take place twice a day at 4 hours a time.

Apart from not having electricity other services like Broadband  Internet, cellphone, landline etc. services experienced outages as generators run  empty and batteries cannot charge to capacity, while systems just crashed etc.  A real big mess!  Amateur Radio also experienced its share of "outages" as many hams do not have a power backup system.

In the Garden Route Area we have several VHF/UHF Repeaters, Simplex Radio Links, Networks that utilize Echolink, Zello and AllStar to connect to other worldwide networks via the Internet. If there is an Internet outage then this means that Echolink and Zello cannot be used and we as radio amateurs need to rely on HF Radio and local "stand alone" repeaters and simplex communications.  Not an ideal situation but in the event of a disaster this means of communication will have to suffice.

How do we solve this lack of Internet during power outages, disasters or emergencies?

This set me thinking and I dug out the AREDN Main Mesh Node from the dust and cobwebs today.  It   has been in storage since 2019. Reason for storage: For you know - "We might one day need old faithful again".  I am going to use the mesh node network as a second Internet backup service when there is an Internet/Cellphone outage for whatever reason. The Mossel Bay AREDN Mesh Network will run from 12v DC Battery Power which is then converted to 5v DC for the Raspberry Pi and Netgear Switch.

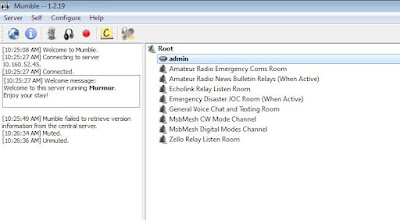
Yes, as mentioned before you can run any kind of service you run on the Internet,  you can also run it on the Mossel Bay AREDN Mesh Network. This would mean that local Mossel Bay VHF/UHF Repeaters, Simplex Links can be linked via AllStar with all the bells and whistles needed but not only that.  You can use your cellphone, laptop, desktop, I-pad, VHF/UHF Radio, repeaters and simplex radios to currently connect tot the following active running services:

  1. Amateur Radio Emergency Comms Room
  2. Amateur Radio News Bulletin Relays
  3. Citadel Email Server and Client
  4. Digital Radio Room
  5. Echolink Relay/Listen Room (TX to be installed later)
  6. Emergency JOC Room
  7. FTP File Server and Storage Facility
  8. General Voice Chat Room
  9. Mossel Bay AREDN Mesh Network Web Page
  10. Zello Relay / Listen Room (TX to be installed later)
     

Today 14 August 2023 I fired up the Mossel Bay AREDN Main Mesh Network and tested all the above service which ran flawlessly.

In Part 2 we will be looking at adding further services as can be seen in one of the images. Amongst the services to be added to the Mossel Bay AREDN Mesh Network will be two way bridges to AllStar Repeaters, DMR and Allstar Simplex Links. We are also able to link repeater backbones via 5.8 Ghz.  More on this in future postings.

Finally:

I plan to install and run a fully autonomous "back-up" Internet and Amateur Radio Communications System on the Mossel Bay AREDN Mesh Network via the GRHub Network in Mossel Bay.  The system could even be opened to the public on 2.4 Ghz during future disasters if needed.  This would be a great service that the public, first responders and radio amateurs can use for various reasons and purposes. I will also use it to link repeaters  and simplex links to the Mossel Bay AREDN Mesh Network via the GRHub Network in Mossel Bay. More about this in future postings

Herewith a few images:  (Click on images for larger view.)


New ZS6CM0 70cm AllStarLink Repeater - Alberton

(Click on images for larger view.) Curtis ZS6CMO recently completed his 70cm AllStarLink Repeater.  In the video the repeater was connected ...