Monday, November 29, 2021

Morse Code Decoder Project


I decided to build myself the PIC16F84 -Based CW Decoder as described in QST August 1999 by Francesco Morgantini, IK3OIL. The project was build in June 2008.


Although designed primarily for learning CW, new and experienced CW operators are sure to like this simple and inexpensive CW decoder!

This project arose from a three fold need.  Firstly to brush up my CW receiving which is currently completely rusted.  Secondly to monitor the HF Beacon Project and thirdly to monitor the VHF Beacon Project.  Please note that this decoder cannot substitute the ear's and brain's interpretation capability nor other similar instruments can do that.  At the most they can help in quickening the morse code learning.  The decoding capabilities are essentially connected to the received  signal quality, it must be clear and strong enough, so don't think you can decode a weak and vanishing signal in the QRM, if this is your goal, you should much better make use of your ears.  If however the signal is good and stable enough, then this equipment can succeed in doing its job well, adapting also itself to the CW rate, provided that it is sufficiently regular.  However the project could be of great assistance to the newcomer who tend to be nervous and have difficulty copying during their initial CW QSO's.   The alphanumeric readout helps you cope with band conditions and variable sending speeds, too. With a decent incoming signal level, this decoder performs well, automatically adapting itself to the incoming CW at speeds between 5 and 30 WPM.

Specifications:


The device is equipped with a 2x16 LCD display , the text shifts from left to the right starting from the end of the second row. An inter-words automatic spacing function is provided, based on a regular timing of the pauses in the sent code. This function may be inhibited grounding the J pin if the device is used for training purposes or while receiving an improperly sent code. The audio input must be at least 100 mV pp, a clipper is provided to cut large signals. The band width is about 100 Hz and the center frequency may be adjusted  between 700 and 1000 Hz by a trimmer. A service push button (P1) displays the keying rate in chars/min, this measure is refreshed every N received characters (N is a settable software parameter). An input is provided for a straight Key, and both inputs (audio and key) activate  the code display and the audio monitor function, a LED is operative while receiving code and shows the correct lock to the audio input, these two monitoring functions are very helpful to adjust the receiver tune because of the narrow bandwidth of the decoder. The BF monitor can drive a 32 Ohm earphone with the two sides series connected. The Vcc can be supplied by a 9V transistor battery and requires about 15 mA. An external supply (min 9V) is however recommended for long time use. When powered on, the microprocessor is set for an intermediate keying rate, some characters may be therefore required to reach the lock with the received signal if it is very slow or very fast.

The Decoder Software:

The software developed makes use of the assembler PIC16 language and run on a PIC16F84 microprocessor.  It takes a measurement of the received signal ON and OFF time, obtains some statistical mean values, and calculates three parameters which are then used for decoding.  An interword automatic spacing function is provided, based on a regular timing of the pauses in the code received.  If the decoder is used for training purposes, or while receiving improperly sent CW, the interword spacing can be turned off.  With the interword spacing turned off, received characters follow one another in a single continuous alphanumeric string.  The decoder's initial setting is approximately 15 WPM and is refreshed every 15 dits or dahs received.  The character set includes all letters, numbers, 0 through 9, the period, comma, hyphen, double dash and question mark.  Unrecognized characters are displayed as an asterisk.  (*)  The prosign SK is displayed as an (#).

Circuit Description:


The schematic appears very simple, actually almost all of the functions are performed by the microprocessor software, while an NE567 tone decoder takes charge of processing the audio input signal.  This IC contains a PLL circuit whose lock frequency may be adjusted between 700 and 1000 Hz by the RV2 trimmer.  With the listed component values a bandwidth of about 100Hz is obtained.  The PLL measured lock delay is about 10 mS.  A clipper is provided to limit the input signal amplitude, it is obtained by 2 germanium diodes.  Pin 8 of the PLL drives on gate of the CMOS trigger NAND 4093 whose output is connected both to the microprocessor gate and to a second CMOS gate working as an audio generator.  The remaining two 4093 gates are used to implement a buffer capable of driving a medium impedance load (64 Ohm).  A 78L05 regulator supplies both the decoder module and the LCD display with power. RV1 trimmer is used to adjust the display brightness.  The only other required tuning is the RV2 trimmer to obtain the best frequency lock using an input CW signal strong and clear from your receiver.


TOP:  LCD showing DE ZS1I BEACON K decoding


TOP: The Morse Code Decoder being tested on the test bench.

I finished the Morse Code Decoder Project.  Here are some photos of the finished decoder.  I tested it with the local 80m beacon and it seems to work fine.  However the proof is in the pudding and I will test the decoder soon on the 20 meter band.  I will also add my morse key to it and test my ability to send morse at a reasonable speeds.  I will give a full report of the final tests soon.


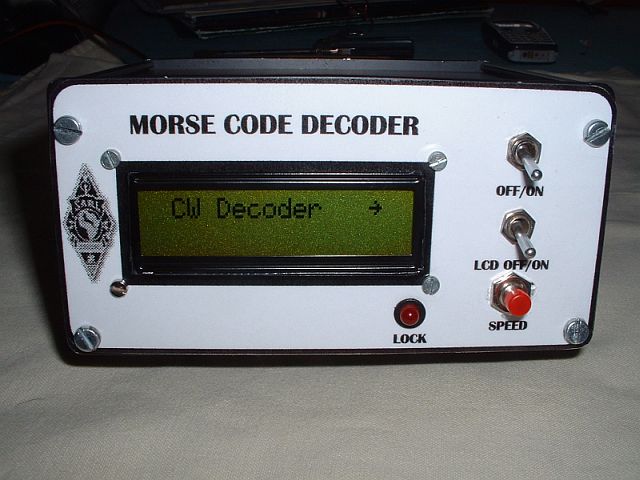
Above:  Completed Morse Code Decorder


Above:  Inside view of the decoder.  I added a 5V power supply(back PCB) backup for the LCD backlight as with the on board power supply the LCD tends to  "flicker" while the CW was decoded. With the backup power supply this problem was solved.


Above:  Rear view of the Morse Code Decoder


Morse Code Decoder Review:
This is my personal observations relating to the Morse Code Decoder.   As already mentioned supra this decoder was developed by IK3OIL primary for learning Morse Code. Please note that this decoder cannot substitute the ear's and brain's interpretation capability nor other similar instruments can do that.  At the most they can help in quickening the morse code learning.  The decoding capabilities are essentially connected to the received  signal quality, it must be clear and strong enough, so don't think you can decode a weak and vanishing signal in the QRM, if this is your goal, you should much better make use of your ears. If however the signal is good and stable enough, then this equipment can succeed in doing its job well, adapting also itself to the CW rate, provided that it is sufficiently regular.  However the project could be of great assistance to the newcomer who tend to be nervous and have difficulty copying during their initial CW QSO's.   The alphanumeric readout helps you cope with band conditions and variable sending speeds, too. With a decent incoming signal level, this decoder performs well, automatically adapting itself to the incoming CW at speeds between 5 and 30 WPM.

This was a very satisfying project to build and after completion that feeling only experienced by home-brewers rose within my system.  Truly the symptoms of the "knack" was treated with this project.  Enough let's get to the bottom line of this decoder.  Although the decoder was used once or twice to monitor the 7Mhz Beacon in George and the  3.5Mhz Beacon in Mossel Bay, I could really not judge the Morse Code Decoders performance.

The first opportunity to really test the decoder arose during the SARL CW Contest that took place on 31 August 2008.  I used the following equipment to monitor signals.   Yaesu FT817 connected to the Morse Code Decoder.  I used a Rally Trap Antenna for 40 and 80 Meters.  It was possible to decode several stations , but not without some letters going astray.   It was however possible to receive 85% of the CW send during the contest although band conditions was rather poor.

Finally:  This is really a super little project that assisted me to brush up my CW again.  Many thanks to
Francesco Morgantini IK3OIL for making this project available to interested radio amateurs!

Saturday, November 27, 2021

What happened to all the experimenters and inventors in amateur radio?


What happened to all the experimenters and inventors in amateur radio?

You might say what a question! Here he goes again! No!,  this is serious and I am not the
only one that echo’s this sentiment. Some time ago I noticed Eddie ZS6BNM posing questions on the SARL Forum and I quote:

“If we look at all the inventors from the past century (100 + Years) so much was discovered!
What are we as hams doing to discover more of the unknown?
Who will be there to assess what is new or old? Where are our inventors?
Digital modes comes close to that - new development almost every day!"

I hope I am wrong, but has amateur radio become a black box operator’s hobby? Prove me wrong! Yes, prove me wrong by sending in your projects, inventions and experimental “concoctions” to the GRHub Network for publishing.  Click HERE

I will only then believe that there are still amateur radio inventors/experimenters out there doing their thing. I might sound negative, paranoid, and pushy, call it what you like, but lets be honest, there are many out there that still experiment and explore. Why keeping this to yourself? We owe it to those that have come and gone, pioneers that build the history of amateur radio in this country.

Lets follow in their footsteps and show others what amateur radio is really about.


Thursday, November 25, 2021

History of the ZS1AGI 40 M QRP Beacon constructed by Mike Hanslow then ZS1RMS (5th April 1996)

ED: The history of the 40m beacon described here was send to me by Mike Hanslow in April 2005 and was published during July 2005 in the then Gizmo Amateur Radio Forum Gazette.  As far as can be established this beacon is the longest operating licensed beacon in South Africa. 

Image: The above image reflects the beacon antenna installed between two radio masts and premises at the George Airport circa 1996.
 

Specifications of ZS1AGI/B

Frequency : 7025KHz

Power : 200mW

Operation : 24 Hours a day

Location : George Airport Transmitter building.

: 3400’ 09,53318” S

: 2222’ 26,62082” E

: 220,330 Meters above sea level

QRA : KF16EA

Mode : A1A

IDENT : Cyclic identification repeated, V DE ZS1AGI/B KF16EA followed by a long tail.

ANT : Half wave dipole oriented North South at a height of 10 meters : (1/4 wave

high) with a ground embedded reflector radial.

QSL INFO :P O Box 450

Wilderness

6560

South Africa


History of ZS1AGI/B

The 40 meter band QRP project evolved out of a number of factors. ZS1J whiles living in Plettenbergbay, operated a number of QRP beacons on the 160, 80, 30 and 10 meter band. As 40 meter band being very popular was void of any indication as to the condition of the band. Also having read about the early pioneers in radio engineering doing vast experiments studying the ionosphere. I thought I could create my own experiment on a much smaller scale to study the seasonal effects on the 40 meter band using a very low powered transmitter.

Permission was granted by my employers for me to erect the 40 meter band antenna from the supporting towers used for the transmitting antennas at George Airport. After having found no suitable diagrams, I designed and built the QRP transmitter, employing an EPROM to contain the coded message. The beacon first transmitted my call sign. Not believing that the initial 500 mW transmitter power would provide such wide and reliable coverage within South Africa, the reaction from the amateur community was very positive. 

The choice of frequency had to do with the international QRP calling frequency was 7020 KHz. I just choose a frequency that would be easy to remember and close the QRP calling frequency. The beacon was first put to the test on the 5th April 1996 from my QTH, causing much curiosity and interest on the 40 meter band. Later it was installed at the airport running temporary on my call sign.

A decision was taken by the local radio club (Garden Route Radio Club ZS1GRC) to license the beacon.

After much correspondence a license was issued, the first beacon for the 40 meter band to be licensed in South Africa. The new EPROM was programmed with a very long tail, at the request of a number of hams to get a stable signal indication and transmitter power was reduced to 200 mW. The ground radial was added to improve vertical signal radiation. Many hams are in the habit to monitor ZS1AGI/B before proceeding to their favorite net. 

Even Dwight West, ZS6NT, the then SARL propagation Elmer posted a very comprehensive propagation prediction coverage down to me. QSL cards though very scares were received from a wide geographical region, the furthers being from Zimbabwe. Even an unconfirmed report of it even being heard in Canada from G3USF, the IARU beacon manager for region 1. 

In the nine years the beacon has being on the air, it has sustained lightning damage twice and needed repairs once to the antenna system. A full article written by myself even appeared in Radio ZS in December 1996. With the success of my QRP beacon, Roger ZS1J recently operated a test beacon with only 100ì W of power with great success. It was even copied in North America, though the recipient did use a very sophisticated receiver with DSP (digital signal processing). It just goes to show that you don’t need power to get your message across, HI HI.

73 and happy DX

Mike Hanslow

ZS1RMS

28 April 2005


Global QRP Beacons on 40 Meters

Here is the list of all 40 meter beacons from G3USF's Worldwide List of HF Beacons (7 August 2003 )

Freq Call Town Loc ERPw

7025 ZS1AGI George Airport KF16EA 0.2

7029 ZS1J Plettenberg Bay KF15PF 0.0001

7038.5 OK0EU Pruhonice JN79GX 1

7080 DL5KZ 10mw

QSL Cards

Here are some of the comments received via QSL cards, while the beacon was running under my call sign.

ZS4XJ

Well Done”

ZS1KC

Beautiful indeed! Congratulations. Read your article in Radio ZS dd 12/96”

ZS1AAK

Very Nice Beacon”

Z21HL

Heard ur beacon – thru heavy QRN. Above report is of interest” [Sig report 439]

ZS6MGD

And I mean zero nine. Ur ½ W do ing well. Good Article in ZS. I don’t suppose everyone has facilities to

string up ant like that (hi). Best success with Beacon God Bless Marc”

ZS4NIC

Dankie, die beacon help baie”


Images:


Image: Beacon Keyer Diagram (Click for larger view.)


Image:  Beacon TX Diagram (Click for larger view.)


The above two images was received from Mike then ZS1RMS.  This is what the beacon looked like as installed at the George Airport.


The last two images was send to me by Saney ZR1S. The beacon is currently operational from the property of Saney ZR1S in Wilderness after Mike then ZS1RMS left South Africa to settle in Cairns, Australia. 

Since Mike left South Africa many radio amateurs played a major roll to keep the beacon on the air.  I do not like to mention names as I might leave somebody in the cold.  Many radio amateurs also played a minor roll.  To each and everyone a big thank you who assisted in keeping this beacon alive and on the air.  👍👍👍


Why does the audio suddenly fall away after 15 minutes on the 145.550 Mhz Simplex Link?


 I received several emails from radio amateurs  asking why the audio suddenly fall away after 15 minutes on the 145.550 Mhz Simplex Link.   A previous article in this regard refers.

"I would once again like to remind my fellow radio amateurs of the fact that the GRHub Network is linked to several large networks world wide.  I still find that many stations are to "quick on the trigger".  For those who do not know what quick on the trigger means its quite simple. Some repeater users  do not leave at least a 6 second gap between overs to allow the repeaters and links to "drop out" that are connected to  networks.   We must allow the networks to reset other wise the time out timers will cut the audio and you will not hear any audio on repeaters or RF simplex links.  This could lead to all sorts of problems if radio amateurs start talking over each other.  Not to talk about leaving others in the cold  or not allowing others to join the conversation, just to mention a few issues.

It is thus good practice and amateur radio etiquette to leave a 6 second gap between overs.

Request:  Please leave a large enough time gap between overs on any repeater, simplex frequency and for that matter any system, radio or network.  You will not lose anything in doing just that."

Wednesday, November 24, 2021

Prevent that magic smoke from coming out!

 Protect you equipment against reverse polarity. I hear you say that will never happen to me.  Yes I know, it will not happen to you, you will never get the connections to the power supply or battery round the wrong way, will you?  YOU WILL.  I speak from experience!

So fit  some protection.  The image below are some circuits commonly used to prevent damage caused by reverse polarity and to prevent the magic smoke from coming out!

The first circuit, A will cause a slight voltage drop especially if used to protect a circuit with higher current consumption.  I use B in most of my radios and electronic projects that does not have reverse polarity protection as C is more refined in that the relay will only work when the polarity is correct.

The three circuits is simple and cheap to implement.  Far cheaper than what is will cost you to fix radios and other equipment if you get the polarity wrong.


Tuesday, November 23, 2021

Building a 300 / 200 watt dump load for a Solar Charge Controller


Some viewers wanted more information on the dump load that I use with the Solar Charge Controller described HERE. For a 12v 7 Ah battery I use a 12 volt car brake light bulb.  For  the 100 Ah battery I use the dump described by the backshed.com available HERE.   It works great and is easy to construct from scrap lying around.


Source:  Homegrown Power / thebackshed.com

Monday, November 22, 2021

Heavy Rain cause flooding in parts of the Garden Route Area (21 - 22 November 2021)

Heavy rain and extensive flooding is causing road closures and other issues across the Garden Route Area.  The GRHub Network is now in Severe Weather Mode.   Please do not use the Network for normal chatting or rag-chewing.  The GRHub Network is now available for emergency communications should  there be a need.  VHF Frequency: 145.550 Mhz Simplex. The Reboot Zello Channel is also active and I made contact with Saney ZR1S in the Wilderness area to esquire if they need any assistance in the area.  Currently there is no need but the situation could change if more rain falls in that area.  He will contact Casey ZS1AAS to find out if they are in need of assistance.  The Garden Route Hub Network Twitter account is also active with photos of flooding in the area. 


Solar Garden Light Hack - Battery Charger (AAA, AA Batteries)


 Here is my version of the simple solar garden light hack - Battery Charger. Get four cheap (GAME) path lights for this project. Using the original garden light parts, you can make a high speed solar battery charger for AA or AAA batteries.  Simple and easy to make and does not cost a arm and a leg.


Sunday, November 21, 2021

A solar panel charge controller for all seasons....especially if you cannot find a trusted one!


 This project started long before Eskom implemented load-shedding in South Africa.  I used this solar controller during amateur radio contests to successfully charge deep cycle lead acid batteries.  This unit has served we well through the years.  I never experienced any problems with it and agree with Joel WB5PPV that this unit is the best battery banger for your money.  It is efficient, reliable and has all the useful tweaks.  Whether you are building a mansion, sticking a repeater on top of a hill or just need something to keep your HF radio's happy during load-shedding, this project will do the job.

It has come to my intention that good solar controllers are on back order until the first quarter of 2022 due to the current high demand as a result of load-shedding.  Further price increases will be implemented.  So if you waited till now to do something when the lights go out, maybe you should look at this project. 

Herewith the complete article by Joel Donaldson WB5PPV in PDF format.  Click HERE.  I advise those interested to read the full article.  This project is not a "Chinese" alternative but will serve you very well in any situation be it a large or small scale solar system.  I for one would insist you install extra fuses and circuit breakers.  You can never have to many safety measures in place.

Finally:  I used a few 12v 50 watt globes as the alternative load (R2 - Grey Terminals) to dump the excess power once the battery is fully charged.  This unit is still used from time to time in the shack and in the field with  3 x 100 watt solar panels and a 100 aH battery.  It works great.


Maintenance: Amateur Radio Mast at the Coast

  Over a period of time I noticed that one of my radio masts (Ex Wind Turbine Mast) was showing signs of rust where two pipes were welded to...