Showing posts with label NanoVna. Show all posts

Sunday, December 1, 2024

New Series - Building Low Budget Antennas - J-Pole Antenna for 70 Centimeters (433.500 Mhz) - Project 7

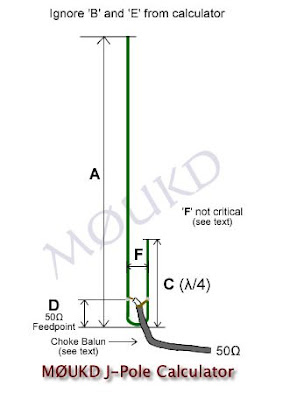
I constructed this antenna a few years ago.  It is an inexpensive antenna that is easy to construct. In about one and a half hours time, and less than R100 worth of materials, you can have a great performing omnidirectional J-Pole antenna. This antenna is based on the same idea as the 2 Meter  J-Pole Calculator available HERE. The J-Pole antenna is basically an end fed half wave dipole that uses a 1/4 wave shorted matching stub as an impedance transformer. The J-Pole antenna will yield slightly less than 3 DB of omnidirectional gain.

The material I chose to build the j-pole antenna was 15 + 20 mm copper pipe and a few other fittings used for plumbing. (View the images below for more detail)  Here are the plans: 


(Click images for larger view.)

I cannot remember which measurements I used many years ago to build this antenna and which frequency was used for resonance.  At the time of construction I did not have an antenna analyzer and the only measuring "tool" was an SWR Meter.   I now have a Nano VNA and I decided to revisit this antenna.  I made a modification to the original antenna.  More in this later.


(Click images for larger view.)

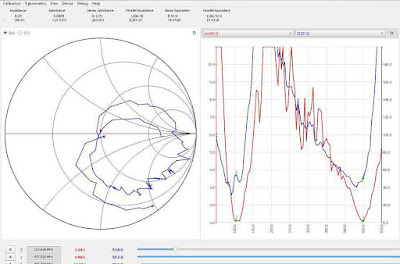
The NanoVNA reflected a 1:1 SWR but the antenna resonated on 411.000 Mhz.  On 433.000 Mhz the SWR was 1:2 - 1:3 and the impedance more than 50 Ohm.  The antenna was usable like I constructed it but I want to modify it to see if I can move the frequency to 433.550 Mhz with a 1 : 1 SWR.  I decided to use a piece of soldering wire (30mm) that I added to the 1/4 wave shorted matching stub. I moved the connection points and BNC connector 20mm upwards.  Spot-on the antenna now resonates at 433.500 Mhz with and SWR of 1:1 and the impedance is 50.9 Ohm.  Now that I know that the matching stub must be extended I needed an easy modification.  Well I came up with the modification as shown in the images  below.


(Click images for larger view.)

What does the SWR and Power output look like on the SWR Meter after the modification.  Here are two images and I would say that the two measuring instruments compare fairly well.


(Click images for larger view.)

Finally:  This antenna will be used for the ZS1I SVXLink Reflector UHF Radio and will be installed permanently this coming week.  Although I originally tuned the antenna with a UHF Radio and SWR Meter I must confess that an antenna analyzer is a must have instrument if you want to construct and play around with antennas.  It provides you with so much more information that an SWR Meter.

Tuesday, April 9, 2024

Christi ZS4CGR toets 'n verskeidenheid van "Rubber Duck" Antennas

Hoe resonant is 'n verskeidenheid van "Rubber Duck" antennas wat algemeen saam met handstelle verkoop word.  OK Chrisi ZS4CGR het 'n paar toetse gedoen.  Let assblief daarop dat die toetse nie in 'n laboratorium gedoen is nie.  Die eindresultate is baie interressant  en gee 'n goeie aanduiding dat sommige "rubber duck" antennas geensins ideale en effektiewe antennas is nie.  Christi se bevindings volg hieronder:


Foto Bo: Nuwe toetse met ’n "ground plane", so het die toets 'setup' gelyk


"Rubber Duck" Antenna VNA toetse - Christi ZS4CGR


Antenna:                       MHz               MHz              MHz

Resonansie:                  Res1               Res2             Res3

UV-5RH                         226                 427

UV-5RA                         211                 434

UV-5R                           204                 427

Diamond RH951S       187                 395

Nagoya NA-771          118                 140               466

PA-NA771                    126                 420


Kommentaar: Nie idiale toets omstandighede nie!

Antenna 1 tot 3 het saam met hulle hand radios gekom

Antenna 4 en 5, soos benaam

Antenna 6, het ek saam met n 2de stel UV-5RA ingevoer vanaf E-Bay (net betyds voor die slang-byt-spuit periode)


Hier volg nou toets grafieke met ’n grondvlak: (Klik op fotos om te vergroot)


Die oorspronklike rubber duck antenna van die UV-5R

Die oorspronklike rubber duck antenna van die UV-5RA

 Die oorspronklike rubber duck antenna van die UV-5RH

Die oorspronklike rubber duck antenna van die UV-9R


 Diamond RH951S

Nagoya NA-771


 PA-NA771


So, wat sê ons nou vir mekaar:

1) Toets die skroefies agterop die radio aan die bokant om te sien watter skroefies het "grond kontak" met die antenna

2) Terwyl jy praat, maak seker dat een van jou vingers kontak het met die "grond skroefie"

3) Dit is duidelik dat een of ander vorm van "counter poise" ’n groot invloed het op die SWR en ook impedansie.

Ek hoop hierdie toetse gaan help om beter resultate te verkry met hand radio’s.


73 uit Luckhoff. Christi  ZS4CGR


New ZS6CM0 70cm AllStarLink Repeater - Alberton

(Click on images for larger view.) Curtis ZS6CMO recently completed his 70cm AllStarLink Repeater.  In the video the repeater was connected ...