January 2008: I am always on the lookout to build a useful and practical VHF/UHF antenna. I ran into a very simple two meter beam as described in QSX the monthly newsletter of P.E.A.R.S. Al Akers ZS2U the author of the article is well known for his knowledge and enthusiasm around the developing and construction of antennas. I decided to build this antenna and give it a workout on VHF DX.
Al ZS2U write: "This antenna was developed for those amateurs who would like to have an antenna which performs somewhat better than a half wave dipole, especially for portable use, but do not wish to construct an elaborate multi-element beam with it's associated matching requirements and it's size and time consuming assembly of dismantling.
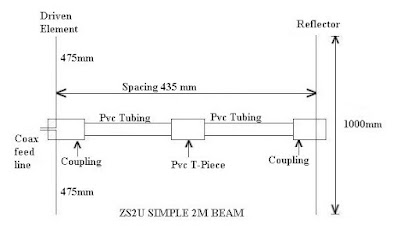
It is a two element beam, consisting of a driven element which is fed directly in the centre with a coaxial cable, and a reflector. The elements are made of 3 millimetre diameter brazing rods (one meter lengths). The boom is made of 20 millimetre diameter PVC electrical fittings and tubing, so make sure the fittings fit snugly onto the tubing. Dimensions are given in the diagram . The elements are mounted in the middle of one half of the couplings and this half is filled with epoxy resin or similar material to support the elements. Attach a piece of PVC tubing to the top of the mast to be used, and the T-piece is fitted onto this. The antenna itself takes less that a minute to assemble or dismantle. The driven element on it's own can be plugged onto the mast and used as a half wave dipole. Used this way, or as a beam, the measured SWR was 1,2:1 maximum across the two meter band. Gain is approximately 4 to 5 dB."
(Click on image for larger view.)
I decided to modify the antenna to suite my needs. I replaced the coupling on the feed line end with a PVC T-Piece which housed the two 475 mm driver elements. You will notice that the 20mm PVC fits snugly into the T-Piece. I inserted a short piece of PVC tubing on both ends of the T-Piece and cut them off flush with the T-Piece. Thereafter I fiited a wooden dowl into the 20 mm tubing. (See photograph for clarity.) I then drilled 3mm holes through the wooden dowls to fit the driven elements. This modification resulted in a very sturdy "element holder" to which I connected the RG58 cable. I assembled the beam and connected it to a SWR meter and two meter set. The SWR was reflected as 1.5:1. I was not very happy and decided to trim the driven elements. This resulted in a 1:1 SWR.
My final measurements were:
Driven Elements: 460 mm
Reflector Element: 1000 mm
Spacing between driven- and reflector element : 445mm
PVC tubing length: 170 mm
Lenght of Coax::1100 mm
It looked darn good and the SWR was "flat", but will this beam be any good. The first opportunity to test the beam was hampered by bad conditions although I managed to have a short QSO with Terry ZS2ABB in Port Elizabeth. A distance of over 300km. In the second attempt I worked Alex RW1ZC/MM on the 6/3/2008 on 2M Voice 144.400 Mhz Fm. Grid: KF35BP 368.3km. Made several contacts while mobile in Mossel Bay at different sites. Power 10 watts.
This proved that this little antenna is worthwhile constructing and is a real asset to my antenna arsenal. A bonus is that you can use this antenna either in the horizontal- or vertical polarized configuration.
So what are you waiting for get to your nearest hardware supply store and gather the necessary hardware to construct this antenna. You will be amazed at it's performance!!
Many thanks to Albert ZS2U for making this antenna project available for homebrew construction.
Photos:


