Tuesday, July 11, 2023

Remixed - Simple Small Projects / Eskom Loadshedding Solutions: Step Down Power Supply Module Project by Christi ZS4CGR


I revisited this project originally constructed by Christi ZS4CGR HERE.

I needed several 5V Power Supplies for the following projects in the ZS1I Shack:

I decided to purchase  2 x  5V 8A Power Supply step-down  4 Port USB output modules to provide power to the above projects.

I also ordered two small cabinets for the units to install the power supplies.

Upon arrival I decided to look for a 3d printed case for easily holding the 4 way USB chargers.  This will save time as I do not have to modify the two small cabinets I ordered to make fit the chargers.  Low and behold I found a 3d printed case for these units.  I printed two cases.  The units fitted perfectly in the printed cases.  It has one hole to secure the PCB to the case.  Normally I use nylon M4 bolts and nuts but having run out of stock I needed another plan.  A metal nut and bolt can be used but I prefer the nylon type.  Another search on the internet and I found 3d printed rivets (3mm x 10mm), just what the doctor ordered.  I printed 4 rivets and then melted the end with a soldering iron to keep the PCB in place.  See images for this brilliant solution.   Okay enough typing.  The images underneath will do all the talking from now on. A big thank you to ibyte8bits  and tudedude  for making their designs available on Thingiverse.  Also a big thank you to Christi ZS4CGR who made this project and sources available to fellow radio amateurs!!

Images:  (Click on images for larger view.)


Monday, July 10, 2023

What is in the Box?


"What is in the Box?"   I do not like to publish every single electronic item I bought or receive.  However it seems that this is quite a popular topic and that readers would like to see more of these posts.  Please note that I do not publish these to brag or boast about but purely out of interest to readers.  Furthermore I do not get paid to talk, review or publish items of manufacturers. 

Items:

  • 4 x Super Blue 5mm LEDs
  • 2 x Enclosures 72 x 50 x 20 mm
  • 2 x 18650 Battery holders
  • 2 x Arduino Buck Converters 5v
  • 2 x Banana Male Set, Red Black 4mm
  • 1 x 3w Amplifier Module + Volume control
  • 1 x BNC Male to Banana 4mm Converter
  • 1 x USB OLED Tester
What do I have in mind for the above modules?
  • Security warning lights
  • Raspberry Pi PWS's
  • Emergency Lights conversion
  • AllStar Radioless Node
  • USB Power Meter 
 
Follow the GRHub Network Blog for updates on these modular projects.   

Images:  Click on the images for large view.


Sunday, July 9, 2023

ZS1I Simple Small Projects: Baofeng UV82 Stand Holder


 I needed a proper stand holder for my Baofeng UV82 HT radio.  The original charger is a real mess and I will in future build my own charger for the radio.  As all the UV82 owners will confess this radio does not stand firmly when in an upright position.  Therefor I found that my UV82 was always lying down in a horizontal position.  This position has already resulted in several falls from a desk or table.  I found this stand holder and 3d printed it.  It is a real gem and works great.  A must have for all UV82 owners.  You have a choice to print a stand with two antenna holder holes or with no holes at all.  I opted for the one with two antenna holders.  The only thing that I would add is four rubber feet to prevent the holder from sliding around on a polished desk.

The 3 1/2 hours that it took to print this stand is worth the while.  I will print another stand for my bed room cabinet.

The photos underneath tells the story of this project, enjoy!!

Images:  Click on images for larger view.


Saturday, July 8, 2023

ZS1I Simple Small Projects: Best Universal Dual Filament Dragon Clip

I tried several filaments clips but found that many of them is useless and others do not work well.  I ran into the best universal dual filament dragon clip.   It clips onto the spool of any brand of filament.  It clips onto 1.75mm or 2.85mm filament.  It is shaped like a dragon hence the name Universal Dual-Filament Dragon Clip.

Why this filament clip?  I've always used filament clips that clip to the filament itself, but I was curious to try one that clips to the spool, so I searched Thingiverse for the best one.  In my opinion this is the best clip that I have used thus far with e-Sun filament spools.  Give this Dual Filament Dragon Clip a try.

Thanks to Lyl3 for making this design available on Thingiverse.

Images:  Click on images for larger view.


Friday, July 7, 2023

ZS1I Simple Small Projects: 3D Printer Filament Roller Guide


Image above:  3D Printer Filament Roller Guide mounted above stepper motor (Click on image for larger view. 


Image above:  3d view of the Filament Roller Guide without the bearing and wheel. (Click on image for larger view.

Now some might say that the above project has nothing to do with amateur radio.  Wrong!  3D Printers is today part and parcel of your amateur radio equipment in the shack.  As my 3D printer is an entry level printer I decided to upgrade/add certain 3d printed parts to the printer to enhance its futures.  I needed a  filament guide to ensure better feeding to the printer head.  This filament solved one of my issues.  This filament guide uses a 608zz bearing and its geometry prevent the filament from hopping out of the bearing wheel.  By far the best design I have come across.

The printing went well but I needed one 608zz bearing for the wheel.  Well there is three options:

  • Buy the bearings new
  • Find an old skate board wheels and remove the bearings
  • Find an old Fidget Spinner and remove the bearings

I had no skate board or fidget spinners I could butcher.  Well buying new bearings was an option but why fork out extra dollars if  I can source the bearings elsewhere.  Your local Chinese shop is the answer.  I visited my nearest shop and picked up a spinner for R20.00.  Some were marked down as low as R10.00 but they had some rust on them and did not run smoothly.  I removed the four 608zz bearings from the spinner.  I used one bearing for the Filament Roller Guide. The other bearings will be used in a Filament Holder Spool Project.  More on this in a future posting.  Cheap solution and I will surely pick up some more Fidget Spinners for future 3D printer projects.  Note this project will only work on a Biqu B1 3d Printer.  Thanks to EddieCoast for making this project available on Thingiverse.


Image above:  Butchered Fidget Spinner to salvage the bearings (Click on image for larger view.)

Video: 


Thursday, July 6, 2023

ZS1I Simple Small Projects: 3D Printed Voltmeter Box/Case


I needed a simple voltmeter box/case for the above voltmeter with a range of 4.5-30V DC for my DIY Solar Generator Project that I am busy constructing.

Having a 3D Printer in the shack resulted in the following case being printed after downloading the  STL Files from Thingiverse.

Many thanks to Flip_Schaumal for making his project files available.

The end result is visible in the images below.  I now have a good looking case for the voltmeter mentioned supra.

Images:  (Click on images for larger view.)


Sunday, July 2, 2023

Lippeklap Net 2 July 2023 at 15h30 on the GRHub Network.


Onderwerp:  Hernubare Energie vir die Amateur Radio Hok of Veld Stasie

More almal.  Kom sluit gerus by ons aan op die GRHub Netwerk vanmiddag (15h30) net na afloop van die Bo Karoo Bulletin.  Ons gaan vanmiddag so bietjie kyk na  die opwekking van hernubare energie in die Amateur Radio Kamer.  Nee ons gaan nie oor Eskom en sy probleme gesels nie.  Ek gaan nie nou die aap uit die mou laat nie.  Kom luister en praat gerus saam vanmiddag.  Met 'n tekort aan elektrisiteit asook gas dink ek dit is nodig dat mens opnuut moet kyk na hernubare energie. 

The talk will be in Afrikaans and English!

Hoe skakel ek in by die Net?

• Echolink - Konnekteer aan ZS1I-L, ZS1SB-L, ZS1FC-L, ZS6WDL-R of ZS5PMB-R Neem kennis as die laaste vier stasies nie gekonnekteer is aan ZS1I-L nie, konnekteer dan via Echolink aan ZS1I-L om by die net aan te sluit.
• AllStar - Konnekteer aan node 49355 ZS1I of 28052 ZS5PMB-R
• VHF - 145.550 Mhz Simplex in die Mosselbaai area. Onthou die 88.5 khz CTCSS toon.
• Enige ander Echolink, AllStar herhaler of link stasie wat aan ZS1I-L gekoppel is.
• Gebruik sommer Echolink wat op jou selfoon geinstalleer is.

Sluit gerus by die Lippeklap Net aan op Sondag, 2 Julie 2023 om 15h30 SAST. 

Fotos:  (Klik om te vergroot.)


Upgrade ZS1I MMDVM Pi-Star Hotspot after experiencing intermittent errors.


There is quite a few hardware hot-spot versions available in the market today.  A few years ago I purchased a "cheap"  Simplex Jumbospot directly from overseas.  I included the OLED screen and metal case. On arrival I installed the firmware and took some time to tune the unit for a low BER with my TYT MD380 Radio.  The unit worked flawlessly until recently when I started to get errors when the unit is  switch on every morning. (The best would be to leave the hot-spot on all the time.)  I expected that a software glitch was causing the hot-spot to "CLOSE" unexpectedly.  I also experienced connectivity issues to Brandmeister.  Once the unit started up without errors it would run fine without issues but I was fed-up to fiddle with the unit every time I started it.  I re-installed the MMDVM firmware but this did not solve the issues on hand.  I replaced the older Raspberry Pi Zero with a newer version but the issues remain.  On close inspection of the metal cabinet I noticed the the spacing between the Zero and the metal case was very close and that the soldering ends might contact the case.  Isolated this did not solve the issues.   However I noticed that when I leave the metal cabinet open the unit would startup without errors.  Closing the cabinet the intermittent issues would return.  Not on a regular basis but just when it really wants to annoy you or when you do not have time to fiddle around to get the hotspot started.  I checked for dry solder joints but did not find any.  Was it time for a new more expensive hot-spot?

I remembered that when I purchased the Jumbospot I did not have a Pi Zero on hand and that I used a Raspberry Pi 3b to run the unit.  Man this thing was flying with the 3b.  It was fast and worked far better than the Zero.  I pulled out a RP 3b, installed the Jumbospot on the GPIO pins and switched on.  What a difference!  The unit was fast, responsive and worked flawlessly without any errors.  I ran it for a few days shutting it down, restarting, rebooting it after a few hours every day.  The errors did not re-appear.  The only issue I had on hand was that I did not have a case for the unit.  It was now larger than before and I had to find a case.  A Raspberry Pi 3b case will not work either as it was to small and could not house the Jumbospot.

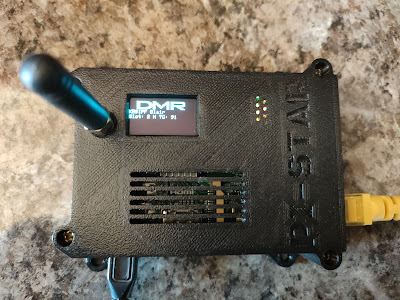
Back to the drawing board.  The only way out would be to 3D print a case for the unit.  After some searching on Thingiverse I found the STL files to 3D print a very useful case.  It took 7 hours to print the case but the end result was worth the time spend.  After completion of the print I fitted the hot-spot into the case fired it up and once again tested to see if the previous errors would return.  It ran beautifully as it should without any issues.  I guess the unit was asking for an upgrade.  This upgrade was really a great improvement to my MMDVM ventures and I now have a fast, reliable Simplex Jumbospot in the Shack to use.

Finally:  I would like to thank  "Coffeebuilt" for creating such a modern looking and practical  case for the MMDVM Pi-Star Hot-Spot.  I would recommend others to use his designs in this regard.  The link to his Thingiverse page is available HERE.

Images (Click on images for larger view)


Bloemfontein ZS4RM AllStarLink Node now active!

  Yet again another AllStar Node has been activated. This time it is the node of  Roelhof ZS4RM from Bloemfontein. Bloemfontein is located i...